

C++光线追踪渲染器加强版
- 01 6 月, 2021
- by
- pladmin
引言
上一篇博客实现了光线追踪的基本功能。因为内容很基础再加上一时的懒惰,所以没有对代码做过多的解读。但从这一篇起,内容开始变得丰富及困难,因此我会尽量解读每一段代码。
回顾之前的工作,我们完成了光追基础算法、两种基础几何体(三角形、球体)、一种纹理(棋盘纹理)、三种材质(均匀漫反射、镜面反射[即金属]、透射)、一些特技(反走样、光圈模糊)、一种场景(随机生成物体的室外场景)。现在我们有几个可改进的点:
1、缺少仅带独立光源的场景,例如CornellBox;
2、纹理单一,没有加载图片的功能;
3、模型单一,只有几种简单几何体。
接下来的内容将围绕上述几个问题来做出解决方案。
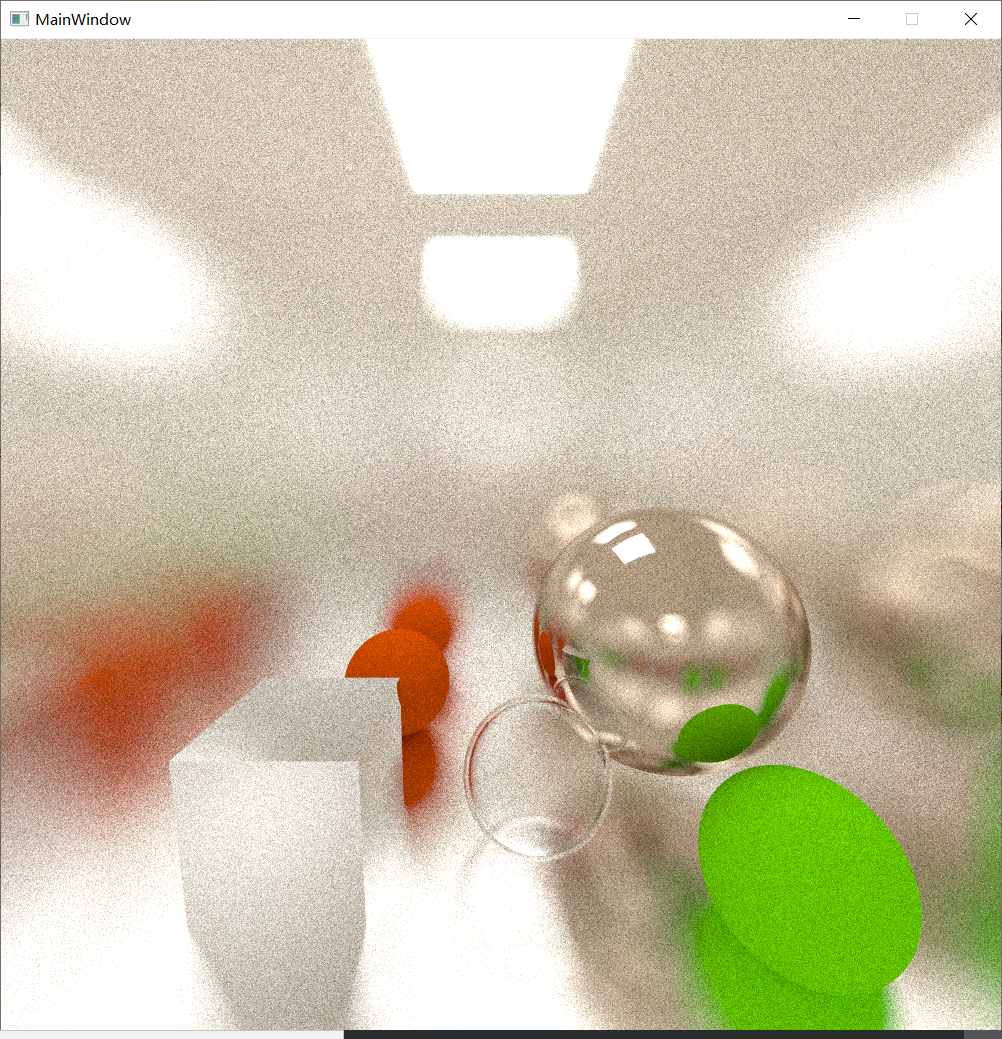
康奈尔盒
康奈尔盒几乎成了光线追踪中最著名的场景了,因为其以最简洁的场景结构突出了最鲜明的光追效果。我们先来看一下康奈尔盒长什么样子:
默认的康奈尔盒就如上图所示,整个场景被一个空心正方体包裹住,左边一个绿皮,右边一个红皮,相机后方其实还有个蓝皮,然后上前下三个都是白皮。除此之外,还有一个负责照亮场景的光源,一般放在盒子顶部。
这个默认场景非常简单,无非就是6个正方形面,或者说是12个三角形拼凑而成。它的结构和正方体几乎是一样的,但有一个重要的区别,就是法线方向。由于我们的所有物体、光源、相机都在正方体内,因此我们需要翻转所有法线,让它们的方向朝盒子内部。
这样我们可以再另外定义一个几何体类——cornellBox,然后把正方体的那套内容复制过来即可。需要改动两个地方:一个是将所有法线翻转,另一个是考虑到6个面的材质不同,我们需要定义一个容量为6的材质组,为6个面分别赋值。
1 2 3 4 5 6 7 8 9 10 11 12 13 14 15 16 17 18 19 20 21 22 23 24 25 26 27 28 29 30 31 32 33 34 35 36 37 38 39 40 41 42 43 44 | class cornellBox { public: shared_ptr<triangle> tg[120]; int faceCnt=12; shared_ptr<material> mat_ptr[6]; public: cornellBox(){} cornellBox(point3 pos,double size,shared_ptr<material> mat[6]): mat_ptr{mat[0],mat[1],mat[2],mat[3],mat[4],mat[5]} { double half=size/2; /*前面*/ tg[0]=make_shared<triangle>(pos+vec3(-half,half,half),pos+vec3(half,half,half), pos+vec3(-half,-half,half),vec3(0,0,-1),mat_ptr[0]); tg[1]=make_shared<triangle>(pos+vec3(half,-half,half),pos+vec3(half,half,half), pos+vec3(-half,-half,half),vec3(0,0,-1),mat_ptr[0]); /*上面*/ tg[2]=make_shared<triangle>(pos+vec3(-half,half,-half),pos+vec3(half,half,-half), pos+vec3(-half,half,half),vec3(0,-1,0),mat_ptr[1]); tg[3]=make_shared<triangle>(pos+vec3(half,half,half),pos+vec3(half,half,-half), pos+vec3(-half,half,half),vec3(0,-1,0),mat_ptr[1]); /*右面*/ tg[4]=make_shared<triangle>(pos+vec3(half,half,half),pos+vec3(half,half,-half), pos+vec3(half,-half,half),vec3(-1,0,0),mat_ptr[2]); tg[5]=make_shared<triangle>(pos+vec3(half,-half,-half),pos+vec3(half,half,-half), pos+vec3(half,-half,half),vec3(-1,0,0),mat_ptr[2]); /*后面*/ tg[6]=make_shared<triangle>(pos+vec3(-half,half,-half),pos+vec3(half,half,-half), pos+vec3(-half,-half,-half),vec3(0,0,1),mat_ptr[3]); tg[7]=make_shared<triangle>(pos+vec3(half,-half,-half),pos+vec3(half,half,-half), pos+vec3(-half,-half,-half),vec3(0,0,1),mat_ptr[3]); /*下面*/ tg[8]=make_shared<triangle>(pos+vec3(-half,-half,-half),pos+vec3(half,-half,-half), pos+vec3(-half,-half,half),vec3(0,1,0),mat_ptr[4]); tg[9]=make_shared<triangle>(pos+vec3(half,-half,half),pos+vec3(half,-half,-half), pos+vec3(-half,-half,half),vec3(0,1,0),mat_ptr[4]); /*左面*/ tg[10]=make_shared<triangle>(pos+vec3(-half,half,half),pos+vec3(-half,half,-half), pos+vec3(-half,-half,half),vec3(1,0,0),mat_ptr[5]); tg[11]=make_shared<triangle>(pos+vec3(-half,-half,-half),pos+vec3(-half,half,-half), pos+vec3(-half,-half,half),vec3(1,0,0),mat_ptr[5]); } }; |
康奈尔盒就做好啦。但是如果现在直接渲染康奈尔盒场景的话,一定全黑的。为什么呢,因为缺少光源,因为我们还没有定义光源。那为什么之前那个场景就能渲染出来呢?因为之前那个场景我们定义的是,如果光线打向远方就直接返回天空颜色,本质上就是让天空成为了一个巨大的光源。但在康奈尔盒中,光线无论如何都逃离不出盒子的(除非你给六个面赋值为透射,但这样康奈尔盒就失去它的意义了)。所以接下来的任务就是制作光源。
光源
光源到底是什么?它本质上也是一种材质,即只给环境中提供光照,自身表面不发生任何其它反应的光照。在初级版中,我们知道任何材质都会用一个虚函数scattering来描述它对光线的作用,那么光源材质的作用是什么呢?很简单,就是直接返还光照颜色,并且强制结束光线这一轮的追踪。我们知道光线追踪其实是人眼看东西的逆过程,射入人眼的光线来自于光源,那么每轮光线追踪的终点就应该在光源。
所以我们可以定义一个光源材质,它的属性包括光色度和光强。然后override它的scattering虚函数,函数的内容就是把射线的record中标志颜色的attenuation赋值为色度×光强:
1 2 3 4 5 6 7 8 9 | class light :public material{ public: color lightColor; light(color c,float i):lightColor(c),itensity(i){} virtual bool scatter(const ray& r_in, const hit_record& rec, color& attenuation, ray& scattered) const override { attenuation = lightColor * itensity; return true; } }; |
但是我们好像忘了一件事,因为光源材质有一个特殊的功能:强制终止光线追踪过程,那么我们这个材质就需要一个变量来标识自己是光源。因此我们需要在材质的抽象类中补充一个变量isLight,然后再在光源的构造函数中将它设为true。
1 2 3 4 5 6 7 8 9 10 11 12 13 14 15 16 17 18 19 | class material { public: bool isLight = false; public: virtual bool scatter(const ray& r_in, const hit_record& rec, color& attenuation, ray& scattered) const = 0; }; class light :public material{ public: color lightColor; float itensity; light(color c,float i):lightColor(c),itensity(i){ isLight = true; } virtual bool scatter(const ray& r_in, const hit_record& rec, color& attenuation, ray& scattered) const override { attenuation = lightColor * itensity; return true; } }; |
那么在光追的递归过程中,每当求交成功,程序就得判断一下碰撞到的材质是不是光源。如果是光源的话,那就可以直接返回record中的attenuation了:
1 2 3 4 5 6 7 8 9 10 11 12 13 14 15 16 17 18 19 | color ray_color(const ray& r, const hittable& world, int depth) { if(depth <= 0) return color(0, 0, 0); hit_record rec; if (world.hit(r, 0.001, infinity, rec)) { ray scattered; color attenuation; if (rec.mat_ptr->scatter(r, rec, attenuation, scattered)) { if(rec.mat_ptr->isLight == true) return attenuation; return attenuation * ray_color(scattered, world, depth - 1); } return color(0, 0, 0); } vec3 unit_direction = unit_vector(r.direction()); double t = 0.5 * (unit_direction.y() + 1.0); return (1.0 - t) * color(1.0, 1.0, 1.0) + t * color(0.5, 0.7, 1.0); } |
现在光源就设置完成了。为了程序的美观性,我将场景设置和相机设置都放到一个新的类scene中进行。那么康奈尔盒的场景设置如下:
1 2 3 4 5 6 7 8 9 10 11 12 13 14 15 16 17 18 19 20 21 22 23 24 25 26 27 28 29 30 31 32 33 34 35 36 37 38 39 40 41 42 43 44 45 46 47 48 49 50 51 52 53 54 55 56 57 58 59 60 61 62 63 64 65 66 67 68 69 70 71 72 73 74 75 76 77 78 79 80 81 82 | #ifndef SCENE_H #define SCENE_H #include"hittable_list.h" #include"sphere.h" #include"ray.h" #include"camera.h" #include"material.h" #include"triangle.h" #include"time.h" class scene { public: camera cam; hittable_list world; public: scene(){}; void cornell_scene(double a) { double aspect_ratio = a; point3 lookfrom(0, 10, -0.1); point3 lookat(0, 9.3, -5); vec3 vup(0, 1, 0); auto dist_to_focus = (lookfrom - lookat).length(); auto aperture = 0.001; cam = camera(lookfrom, lookat, vup, 95, aspect_ratio, aperture, dist_to_focus); /*康奈尔盒*/ point3 center(0,10,-10); shared_ptr<material> mat[6]= //前上右后下左 { make_shared<lambertian>(color(0,0,1)), make_shared<lambertian>(color(1,1,1)), make_shared<lambertian>(color(1,0,0)), make_shared<lambertian>(color(1,1,1)), make_shared<lambertian>(color(1,1,1)), make_shared<lambertian>(color(0,1,0)) /*make_shared<metal>(color(1,1,1),0.2), make_shared<lambertian>(color(1,1,1)), make_shared<metal>(color(1,1,1),0.2), make_shared<metal>(color(1,1,1),0.2), make_shared<metal>(color(1,1,1),0.2), make_shared<metal>(color(1,1,1),0.2),*/ }; auto c=cornellBox(center,20,mat); for(int i=0;i<12;i++) world.add(c.tg[i]); /*光源*/ point3 pos(0,19.9,-15); float half = 3; shared_ptr<material> matLight = make_shared<light>(color(1,1,1),4); auto l1=make_shared<triangle>(pos+vec3(-half,0,-half),pos+vec3(half,0,-half), pos+vec3(-half,0,half),vec3(0,-1,0),matLight); auto l2=make_shared<triangle>(pos+vec3(half,0,half),pos+vec3(half,0,-half), pos+vec3(-half,0,half),vec3(0,-1,0),matLight); world.add(l1); world.add(l2); /*实体*/ //auto material = make_shared<lambertian>(color(1,0,0)); auto material1 = make_shared<metal>(color(0.7, 0.6, 0.5), 0.0); world.add(make_shared<sphere>(point3(5, 5, -14), 4, material1)); auto material2 = make_shared<lambertian>(color(0.7,0.1,0)); world.add(make_shared<sphere>(point3(-4, 2, -17), 2, material2)); auto material3 = make_shared<dielectric>(1.05); world.add(make_shared<sphere>(point3(1, 2, -11.5), 2, material3)); auto material4 = make_shared<dielectric>(1.05); world.add(make_shared<sphere>(point3(1, 2, -11.5), -1.8, material4)); auto material5 = make_shared<lambertian>(color(0.2,0.8,0)); world.add(make_shared<sphere>(point3(6.5, 1.5, -9), 2, material5)); auto materialc = make_shared<metal>(color(0.8, 0.8, 0.8), 0); auto cubes=cube(point3(-5, 2, -11),4,materialc); for(int i=0;i<12;i++) world.add(cubes.tg[i]); return; } }; #endif // SCENE_H |
实体部分大家可以自由改成自己喜欢的内容,这些完全看个人喜好。那么在renderRoute类的loop函数中,设置场景和相机部分就变得非常简洁了:
1 2 3 4 5 6 | const double aspect_ratio = (double)image_width / (double)image_height; auto *scenes = new scene(); scenes->cornell_scene(aspect_ratio); auto world = scenes->world; auto cam = scenes->cam; |
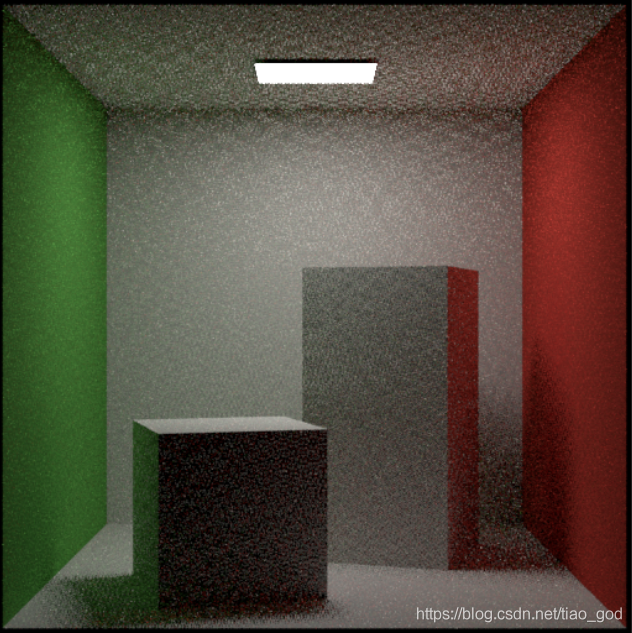
接下来就可以开始渲染了。最终康奈尔盒的场景如下:(程序中正方体使用的是透射材质,但下图当时用的还是反射材质,不过不要在意这些细节了~)
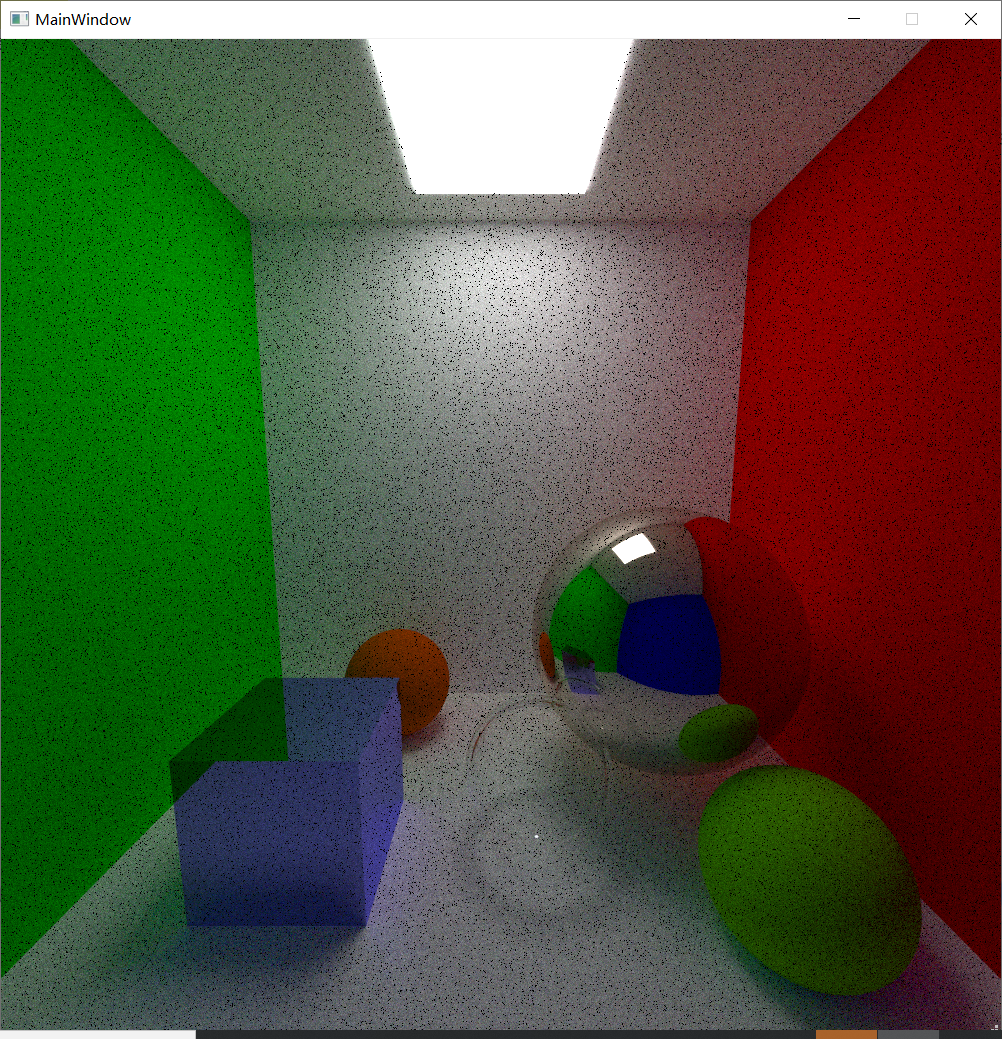
当然你也可以整活,比如将四周的盒皮换成反射材质,这样整个场景就变得“劲爆”起来了:
球体纹理
之前我们创建了多种材质,但是这些材质表面的颜色都过于单调,我们希望能够让物体表面显示想要的图片纹理。因此我们可以设计一个显示图片纹理的材质类:imageTexture。首先还是继承抽象类Texture,然后考虑它的成员变量,因为图片纹理无非就是一张规格化的图片,因此我们只需要两个描述尺寸的变量height、width,以及用来存储图片颜色信息的指针变量pixelBuffer:
1 2 3 4 5 6 7 8 9 10 11 12 13 14 15 16 17 18 19 20 21 22 23 24 25 26 27 28 29 30 31 32 33 34 | class imageTexture :texture { public: int width,height; shared_ptr<QImage>pixelBuffer; public: void loadImage(const QString &path) { pixelBuffer=make_shared<QImage>(); pixelBuffer->load(path); width=pixelBuffer->width(); height=pixelBuffer->height(); } color getCol(double u,double v) { unsigned int x = 0, y = 0; if(u > 1.0f) u = u - static_cast<int>(u); else if(u < 0.0f) u = 1.0f - (static_cast<int>(u) - u); if(v > 1.0f) v = v - static_cast<int>(v); else if(v < 0.0f) v = 1.0f - (static_cast<int>(v) - v); double trueU = u * (width - 1); double trueV = v * (height - 1); x = static_cast<unsigned int>(trueU); y = static_cast<unsigned int>(trueV); color result(static_cast<float>(pixelBuffer->pixelColor(x,y).red()) * 1.0f/255, static_cast<float>(pixelBuffer->pixelColor(x,y).green()) * 1.0f/255, static_cast<float>(pixelBuffer->pixelColor(x,y).blue()) * 1.0f/255); return result; } }; |
pixelBuffer是一个QImage类型的指针。QImage的好处是存储结构很简洁,并且可以直接调用load函数来导入外部图片。
imageTexture一共两个成员函数,第一个是loadImage,可以根据输入的路径字符串来导入图片,并设置纹理的尺寸;第二个是getCol,其实就等价于软渲染器项目中的sample采样函数,给定一个u和v(u和v的范围是0~1,分别表示横向、纵向采样位置的比例),返回其在纹理中的颜色。要注意的是我们的纹理是循环纹理,因此u和v均有可能大于1,因此我们多做一步处理,只保留小数部分的内容,这样就形成了循环纹理。
那么问题立马来了。采样要传入u和v,但我们之前没有考虑过光线击中点在材质中的uv值。因此我们需要为hit_record结构体中添加uv:
1 2 3 4 5 6 7 8 9 10 11 12 13 | struct hit_record { point3 p; //交点 vec3 normal; //法向量 shared_ptr<material> mat_ptr; double t; //距离 bool front_face; double u,v; inline void set_face_normal(const ray& r, const vec3& outward_normal) { front_face = dot(r.direction(), outward_normal) < 0; normal = front_face ? outward_normal : -outward_normal; } }; |
那么当光线击中材质表面时,怎么计算它的uv呢?这里球体的uv计算和三角形是完全不同的。先介绍一下球体uv的计算方法:
对于球体上的每一个点,都会对应一个方向角θ和天顶角ϕ,这两个量其实就是球坐标系中的两个角度参数。我们在球坐标中有这样的表示方法:
$$x=cos(\phi)cos(\theta)$$
$$z=sin(\phi)cos(\theta)$$
$$y=sin(\theta)$$
根据上式,θϕ两个角的大小可以直接推出:
$$tan\phi=\frac{z}{x}$$
$$\phi=arctan\frac{z}{x}$$
$$\theta=arcsin(y)$$
uv与θϕ的关系为:
$$u=\frac{\phi}{2\pi}$$
$$v=\frac{\theta}{pi}$$
这样我们可以先根据球上某点的法线得到xyz,根据上述推导式得到θϕ,然后再得到uv。给sphere类补充一个计算uv的函数:
1 2 3 4 5 6 7 |
uv的计算应该是在光线hit碰撞体的时候完成的,因此扩充一下球体的hit函数:
1 2 3 4 5 6 7 8 9 10 11 12 13 14 15 16 17 18 19 20 21 22 23 24 25 26 27 28 29 30 31 32 33 34 35 36 37 | bool sphere::hit(const ray& r, double t_min, double t_max, hit_record& rec) const { vec3 oc = r.origin() - center; double a = r.direction().length_squared(); double half_b = dot(r.direction(), oc); double c = oc.length_squared() - radius * radius; double discriminant = half_b * half_b - a * c; if (discriminant > 0) { double root = sqrt(discriminant); double t = (-half_b - root) / a; if (t > t_min&& t < t_max) { rec.t = t; rec.p = r.at(t); vec3 outward_normal = (rec.p - center) / radius; rec.set_face_normal(r, outward_normal); rec.mat_ptr = mat_ptr; vec3 uv; getSphereUV(outward_normal,uv); rec.u=uv.e[0]; rec.v=uv.e[1]; return true; } t = (-half_b + root) / a; if (t > t_min&& t < t_max) { rec.t = t; rec.p = r.at(t); vec3 outward_normal = (rec.p - center) / radius; rec.set_face_normal(r, outward_normal); rec.mat_ptr = mat_ptr; vec3 uv; getSphereUV(outward_normal,uv); rec.u=uv.e[0]; rec.v=uv.e[1]; return true; } } return false; } |
这样当光线击中球体时,hit函数会计算uv值,并将结果写入hit_record中。接下来我们还要额外创建一种材质,相当于专门用来贴图片纹理的材质类:lambertianImage:
1 2 3 4 5 6 7 8 9 10 11 12 13 14 15 16 | class lambertianImage :public material{ public: shared_ptr<imageTexture> tex; public: lambertianImage(const QString str) { tex=make_shared<imageTexture>(); tex->loadImage(str); } virtual bool scatter(const ray& r_in, const hit_record& rec, color& attenuation, ray& scattered) const override { vec3 scatter_direction = rec.normal + random_unit_vector(); scattered = ray(rec.p, scatter_direction); attenuation = tex->getCol(rec.u,rec.v); return true; } }; |
构造函数需要传入纹理的路径字符串,这样才能让对应的纹理load图片。然后我们重写该材质类的虚函数:scatter。它的散射模型和朴素lambertian一样,即反射光线选择 以法线方向为轴的半球随机方向出射。唯一不同的就是返回的颜色值attenuation,它就根据record中记录的u、v值来对纹理采样即可。
重新设置一下scene,可以得到如下效果:

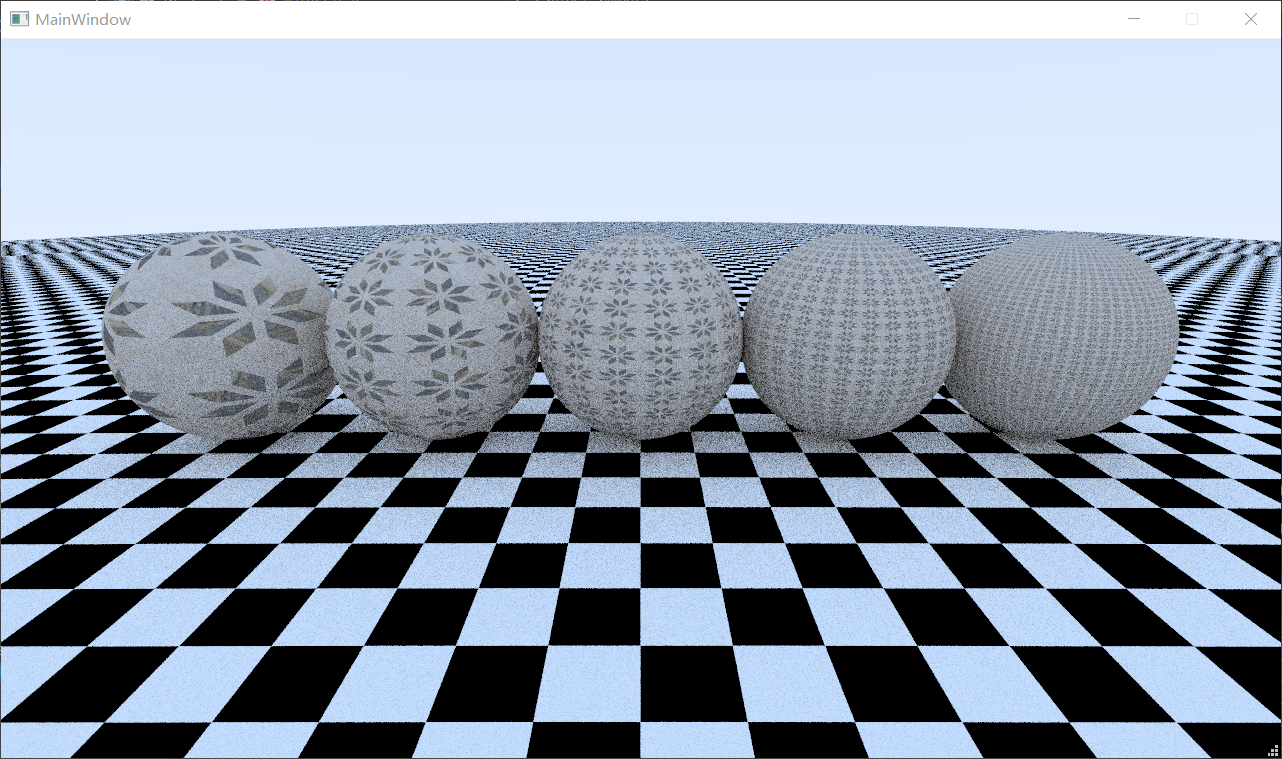
接下来还有个小问题,就是有些贴图贴到球体上后,显示的太“大”或者太“小”了。因为按照咱们的程序,贴图上的每一个像素和球体上的每一个片元都是一一对应的,即贴上去的贴图大小是固定的。我们希望能够调整贴图的scale,因此可以在对应的材质类上添加两个描述scale的变量:scaleX、scaleY,那么在采样的时候,我们只需要将record中的uv扩大scaleX、scaleY倍即可:
1 2 3 4 5 6 7 8 9 10 11 12 13 14 15 16 17 | class lambertianImage :public material{ public: shared_ptr<imageTexture> tex; double scaleX,scaleY; public: lambertianImage(QString str,double sx,double sy):scaleX(sx),scaleY(sy) { tex=make_shared<imageTexture>(); tex->loadImage(str); } virtual bool scatter(const ray& r_in, const hit_record& rec, color& attenuation, ray& scattered) const override { vec3 scatter_direction = rec.normal + random_unit_vector(); scattered = ray(rec.p, scatter_direction); attenuation = tex->getCol(rec.u*scaleX,rec.v*scaleY); return true; } }; |
下面就是调整不同scale的结果:
三角形纹理
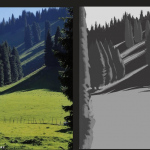
接下来我们来制作三角形的纹理功能。三角形uv的计算需要用到一点窍门。如图所示:
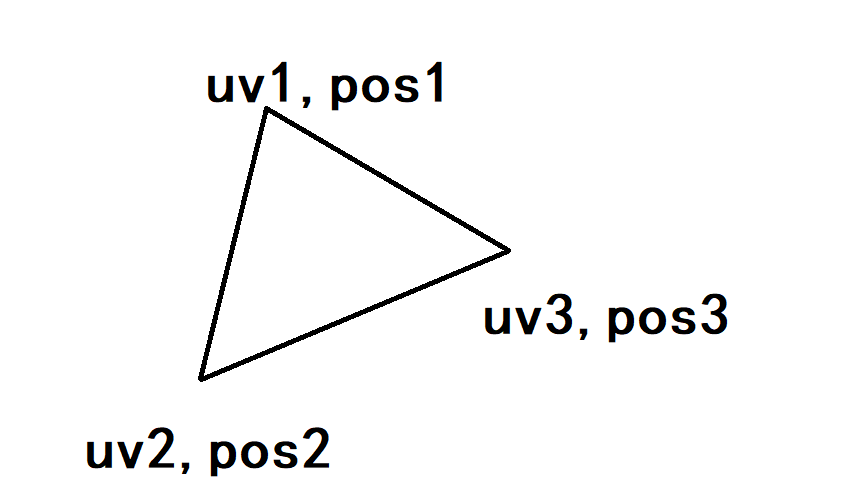
三角形的三个点,每个点都对应着一个三维空间坐标和一个二维纹理坐标。如果现在已知三角形上某点Q的空间坐标,如何求它的二维纹理坐标呢?这里有两个方法,推荐使用第一种,因为第二种又复杂又可能存在bug。。。
第一种比较简单,假设目标点是O,那么O-P1=a*(P2-P1)+b*(P3-P1),这个可以使用克莱姆法则解出a和b的值,那么有:UVO-UV1=a*(UV2-UV1)+b*(UV3-UV1),所以UO=a*(U2-U1)+b*(U3-U1)+U1,VO也同理:
1 2 3 4 5 6 7 8 9 10 11 12 13 14 15 16 17 18 19 20 21 22 | vec3 V1,V2,Vp; double p,q; Vp=rec.p-pt[0]; V1=pt[1]-pt[0]; V2=pt[2]-pt[0]; if(V2.x()*V1.y()!=V1.x()*V2.y()) { p=(V2.x()*Vp.y()-V2.y()*Vp.x())/(V2.x()*V1.y()-V1.x()*V2.y()); q=(V1.x()*Vp.y()-V1.y()*Vp.x())/(V1.x()*V2.y()-V2.x()*V1.y()); } else if(V2.x()*V1.z()!=V1.x()*V2.z()) { p=(V2.x()*Vp.z()-V2.z()*rec.p.x())/(V2.x()*V1.z()-V1.x()*V2.z()); q=(V1.x()*Vp.z()-V1.z()*rec.p.x())/(V1.x()*V2.z()-V2.x()*V1.z()); } else { p=(V2.y()*rec.p.z()-V2.z()*rec.p.y())/(V2.y()*V1.z()-V1.y()*V2.z()); q=(V1.y()*rec.p.z()-V1.z()*rec.p.y())/(V1.y()*V2.z()-V2.y()*V1.z()); } rec.u=u[0]+p*(u[1]-u[0])+q*(u[2]-u[0]); rec.v=v[0]+p*(v[1]-v[0])+q*(v[2]-v[0]); |
第二种相对就很复杂了。首先,我们必须找到该三角形二维纹理空间的u、v两个轴(一个指向u增大的方向,一个指向v增大的方向)的世界空间表示。只有找到这两个轴的世界空间表示,才能将Q点的世界坐标和纹理空间联系起来。以v轴为例,它表示的是u不变、v增大的方向。我们可以用两个已知的边P3-P1和P2-P1来表示这个v轴:a*(P3-P1)+(P2-P1)。既然这个式子表示了v轴,那么这个结果的u值一定为0,即a*(u3-u1)+(u2-u1)=0,由此我们可以解得:
$$a*(u3-u1)+(u2-u1)=0$$
$$a=\frac{u2-u1}{u1-u3}$$
也就是说,[(u2-u1)/(u1-u3)]倍的(P3-P1)向量与一个(P2-P1)向量相加,便能得到v轴。那么在世界空间中亦然,因此v轴的世界空间表示就是:
$$V_v=\frac{u2-u1}{u1-u3}(P3-P1)+(P2-P1)$$
注意分母等于零的情况,如果u1-u3=0,那么就意味着P1和P3的连线就是v轴,那么Vv=P3-P1。同理也可以计算u轴的世界空间表示:
$$b=\frac{v2-v1}{v1-v3}$$
$$V_u=\frac{v2-v1}{v1-v3}(P3-P1)+(P2-P1)$$
同样要注意分母等于零的情况,如果v1-v3=0,那么就意味着P1和P3的连线就是u轴,那么Vu=P3-P1。
经过上面几步后,我们找到了u轴和v轴的方向,但是我们还没有找到两个轴的长度。意思就是,我们得到的u轴和v轴的方向是正确的,但是得到的长度是一个无意义的数字,现在我们需要让u轴的长度等于u=0的点到u=1的点的长度,让v轴的长度等于v=0的点到v=1的点的长度。以u轴举例,首先我们要求出来P2-P1这条向量在u轴上的投影长度:
$$(P2-P1)·U=|P2-P1|*|U|*cos\theta$$
$$投影长度L=|P2-P1|*cos\theta=\frac{(P2-P1)·U}{|U|}$$
然后我们用投影长度L除以P2、P1两点的u值之差,就能得到当u值差为1时的投影长度应该为多少,这样就得到了u轴的实际长度。v轴同理,不再赘述。仍然要注意分母是否为0,如果分母为0就需要换一对点(如选择P1和P3、P2和P3)进行测试。
接下来我们就可以得到uv坐标原点的世界空间表示了:
$$O=P1-u1*V_u-v1*V_v$$
得到了u轴和v轴的世界空间表示后,我们就可以直接得到目标Q点与u轴和v轴之间的关系:
$$Q-O=u*V_u+v*V_v$$
$$X_Q=u*X_{Vu}+v*X_{Vv} (X_Q指Q-O后的x值)$$
$$Y_Q=u*Y_{Vu}+v*Y_{Vv} (Y_Q指Q-O后的y值)$$
根据克莱姆法则,可以直接写出u和v的值:
$$v=\frac{X_{Vu}*Y_Q-Y_{Vu}*X_Q}{X_{Vu}*Y_{Vv}-X_{Vv}*Y_{Vu}}$$
$$u=\frac{X_{Vv}*Y_Q-Y_{Vv}*X_Q}{X_{Vv}*Y_{Vu}-X_{Vu}*Y_{Vv}}$$
要注意的是,我们默认使用了x分量和y分量代入的关系式。但是事实上可能会存在分母为0的情况:
$$X_{Vu}*Y_{Vv}-X_{Vv}*Y_{Vu}=0$$
此时选择x和y就不适用了。这时候就需要尝试选择x分量+z分量,或者y分量+z分量。至少有一种情况是分母不为0的。最后要注意的是,我们计算出来的u轴和v轴很有可能是反的,此时计算出来的u值和v值很有可能是负数。此时我们只需要对它取相反数即可。
1 2 3 4 5 6 7 8 9 10 11 12 13 14 15 16 17 18 19 20 21 22 23 24 25 26 27 28 29 30 31 32 33 34 35 36 37 38 39 40 41 42 43 44 45 46 47 48 49 50 51 52 53 54 | /*求uv*/ float tmp;vec3 T1,T2; if(u[0]!=u[2]) { tmp=(u[1]-u[0])/(u[0]-u[2]); T1=(pt[2]-pt[0])*tmp+(pt[1]-pt[0]); } else T1=pt[0]-pt[2]; if(v[0]!=v[2]) { tmp=(v[1]-v[0])/(v[0]-v[2]); T2=(pt[2]-pt[0])*tmp+(pt[1]-pt[0]); } else T2=pt[0]-pt[2]; /*注意T1是v轴,T2是u轴,不要搞反了*/ if(dot(T2,(pt[1]-pt[0]))!=0&&u[1]-u[0]!=0) T2=unit_vector(T2)*(dot(T2,(pt[1]-pt[0]))/T2.length())/(u[1]-u[0]); else if(dot(T2,(pt[2]-pt[0]))!=0&&u[2]-u[0]!=0) T2=unit_vector(T2)*(dot(T2,(pt[2]-pt[0]))/T2.length())/(u[2]-u[0]); else if(dot(T2,(pt[2]-pt[1]))!=0&&u[2]-u[1]!=0) T2=unit_vector(T2)*(dot(T2,(pt[2]-pt[1]))/T2.length())/(u[2]-u[1]); if(dot(T1,(pt[1]-pt[0]))!=0&&v[1]-v[0]!=0) T1=unit_vector(T1)*(dot(T1,(pt[1]-pt[0]))/T1.length())/(v[1]-v[0]); else if(dot(T1,(pt[2]-pt[0]))!=0&&v[2]-v[0]!=0) T1=unit_vector(T1)*(dot(T1,(pt[2]-pt[0]))/T1.length())/(v[2]-v[0]); else if(dot(T1,(pt[2]-pt[1]))!=0&&v[2]-v[1]!=0) T1=unit_vector(T1)*(dot(T1,(pt[2]-pt[1]))/T1.length())/(v[2]-v[1]); vec3 Ori=pt[0]-u[0]*T2-v[0]*T1; //printf("%f %f %f\n",Ori.x(),Ori.y(),Ori.z()); rec.p=rec.p-Ori; if(T1.x()*T2.y()-T2.x()*T1.y()!=0) { rec.u=(T1.x()*rec.p.y()-T1.y()*rec.p.x())/(T1.x()*T2.y()-T2.x()*T1.y()); rec.v=(T2.x()*rec.p.y()-T2.y()*rec.p.x())/(T2.x()*T1.y()-T1.x()*T2.y()); } else if(T1.x()*T2.z()-T2.x()*T1.z()!=0) { rec.u=(T1.x()*rec.p.z()-T1.z()*rec.p.x())/(T1.x()*T2.z()-T2.x()*T1.z()); rec.v=(T2.x()*rec.p.z()-T2.z()*rec.p.x())/(T2.x()*T1.z()-T1.x()*T2.z()); } else if(T1.y()*T2.z()-T2.y()*T1.z()!=0) { rec.u=(T1.y()*rec.p.z()-T1.z()*rec.p.y())/(T1.y()*T2.z()-T2.y()*T1.z()); rec.v=(T2.y()*rec.p.z()-T2.z()*rec.p.y())/(T2.y()*T1.z()-T1.y()*T2.z()); } rec.p=rec.p+Ori; //printf("%f %f\n",rec.u,rec.v); /*if(rec.u<0)rec.u*=-1; if(rec.v<0)rec.v*=-1;*/ return true; |
效果如下:
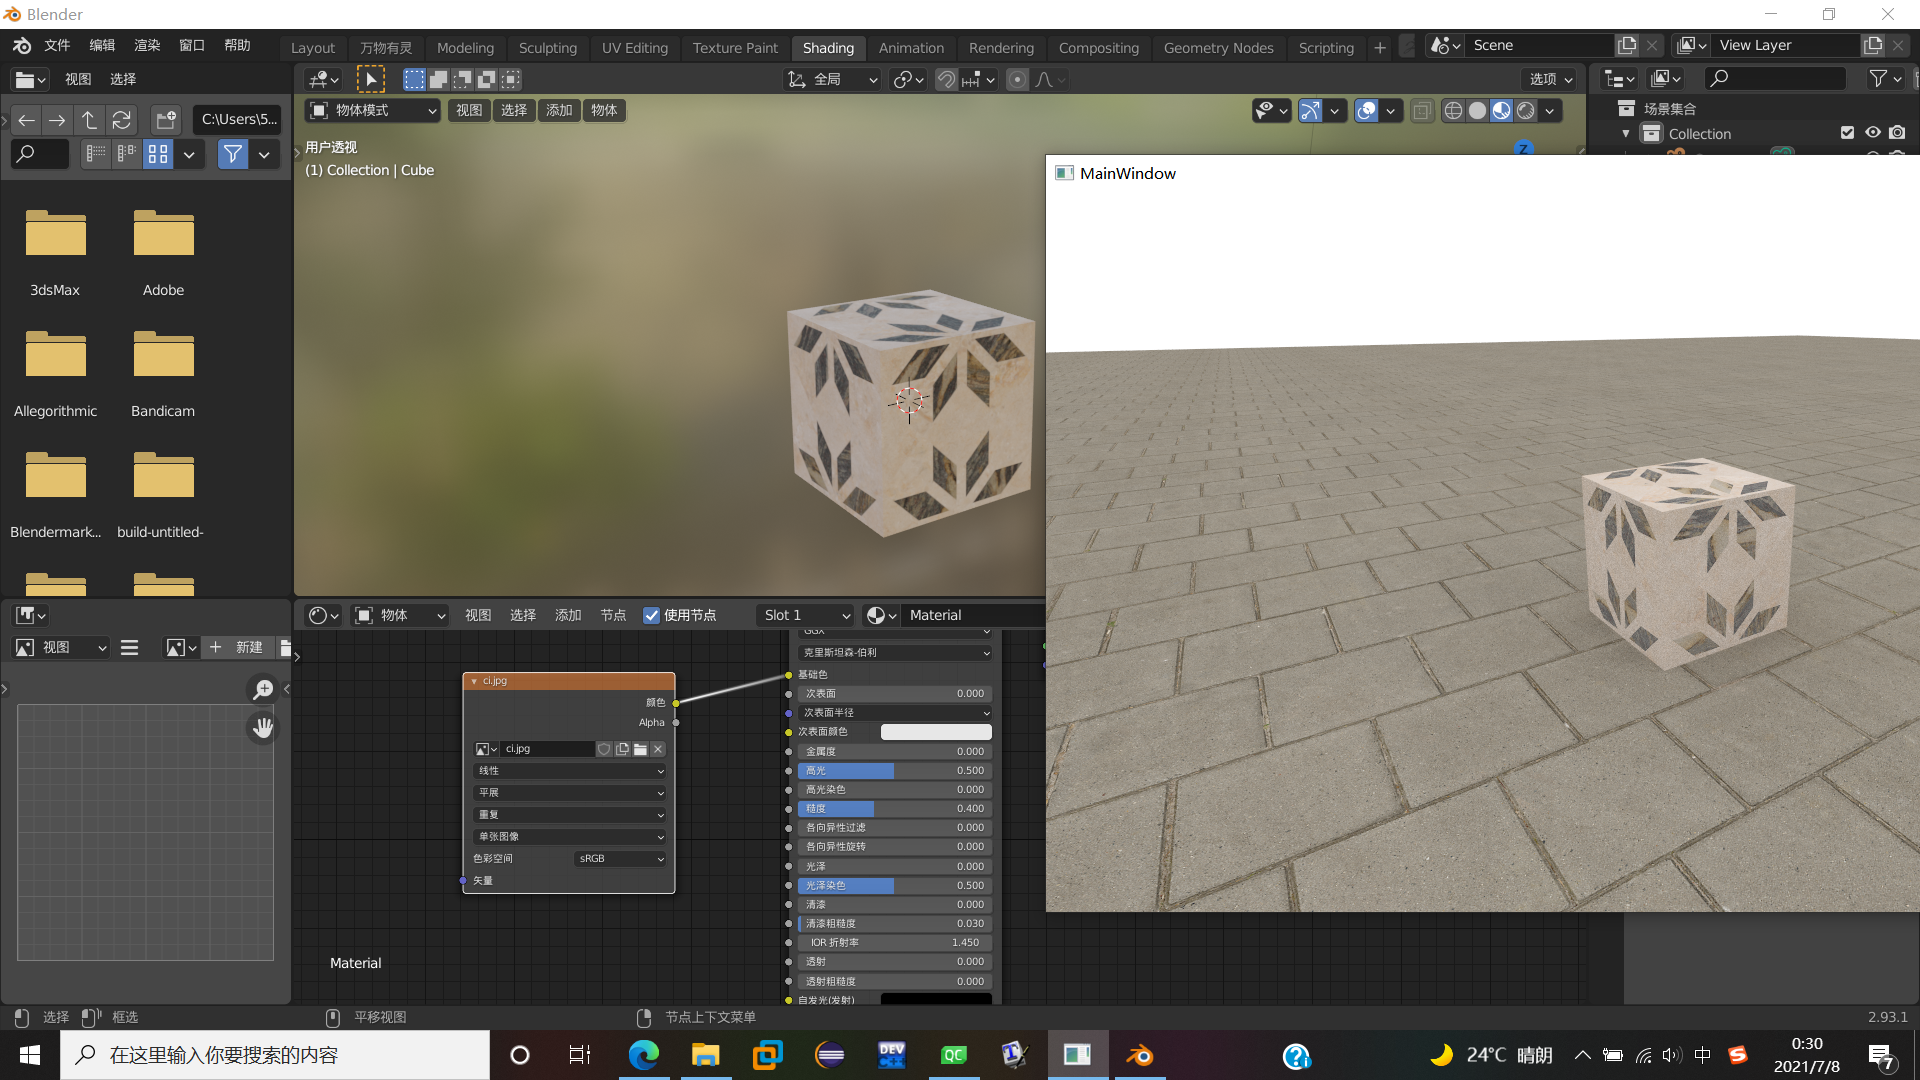
和blender中映射的纹理一模一样,可以证明上述编写的uv逻辑大体正确。
模型导入
只有正方体和球体就太没意思了,我们需要加入一个导入模型的功能。首先需要知道:外部模型普遍是由三角形组成的,因此导入外部模型本质上就是要创建极其大量的Triangle对象。
这里我们以obj格式为例。当我们从建模软件导出obj格式模型后,会生成两个文件,一个是描述模型的obj文件,一个是描述材质的mtl文件。下面首先介绍一下obj文件:
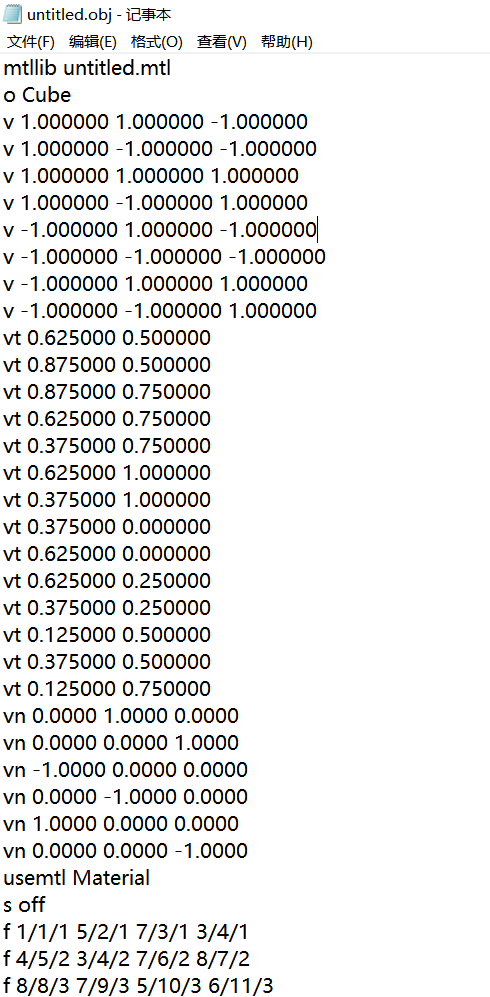
如图所示,obj文件主要由以下几部分构成:材质文件描述,模型描述,顶点索引,纹理坐标索引,法线索引,材质索引,面构成。
第一部分是材质文件描述,即“mtllib untitled.mtl”。它描述了该obj文件对应的材质文件叫什么名字,从而可以直接找到对应的材质文件;
第二部分是模型描述,格式为“o 模型名称”。因为一般obj文件可以存储好几个独立的模型,这里就标明了接下来要描述的是哪个模型的内容。
第三部分是顶点索引,格式为“v x y z”。它存储的就是顶点的坐标。
第四部分是纹理坐标索引,格式为“vt u v”。它存储的就是某点对应的uv值。
第五部分是顶点法线,格式为“vn x y z”。它存储的是某点对应的法线方向。要注意的是,一个顶点可以对应多个纹理坐标和顶点法线,即同一个顶点在不同面上可能有不同的纹理坐标和顶点法线,因此只有在描述面的时候才能具体确定顶点对应的是哪个纹理坐标、哪个法线。
第六部分是材质索引,格式为“usemtl 材质名称”。它描述接下来的若干个面使用的是哪个材质,对应材质的具体信息存储在mtl材质文件中。
第七部分是面构成,格式为“f v1/vt1/vn1 v2/vt2/vn2…”。它描述的是某个面由哪些顶点构成,每个顶点对应的纹理坐标和法线坐标分别是什么。
接下来看一看mtl文件:
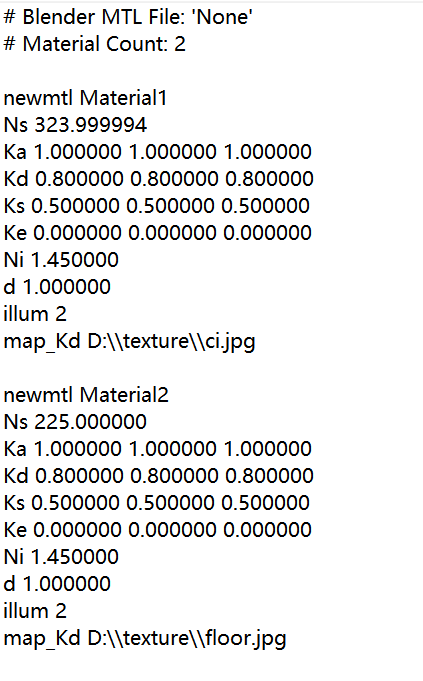
首先使用“newmtl 材质名称”来表示接下来描述的是哪个材质的信息。然后会看到Ns、Ka…illum等材质信息,这些其实是做pbr渲染时用到的一些材质参数。现在我们还没做到pbr阶段所以可以先忽略它们,只需要关注一下“map_Kd”后面存储的贴图路径即可。大体流程就是:当obj文件中提到“usemtl Material1”的时候,就会从该mtl文件中找名称为“Material1”的材质,并从下面的map_Kd后面读出纹理路径,从而导入贴图。(所以贴图的路径不要随意改动)
把obj格式文件的构成弄明白后,就可以开始编程了。这部分像极了字符串处理的算法题,因此我也就不一点点介绍了,直接放代码:
1 2 3 4 5 6 7 8 9 10 11 12 13 14 15 16 17 18 19 20 21 22 | #ifndef MODEL_H #define MODEL_H #include <QFileDialog> #include"hittable.h" #include"vec3.h" #include "triangle.h" class model { public: vec3 *point=new vec3[120000]; vec3 *tex=new vec3[120000]; vec3 *nor=new vec3[120000]; int inf[100][3]; shared_ptr<triangle> tg[120000]; int faceCnt=0; shared_ptr<material> mat_ptr; public: model(QString path); }; #endif // MODEL_H |
1 2 3 4 5 6 7 8 9 10 11 12 13 14 15 16 17 18 19 20 21 22 23 24 25 26 27 28 29 30 31 32 33 34 35 36 37 38 39 40 41 42 43 44 45 46 47 48 49 50 51 52 53 54 55 56 57 58 59 60 61 62 63 64 65 66 67 68 69 70 71 72 73 74 75 76 77 78 79 80 81 82 83 84 85 86 87 88 89 90 91 92 93 94 95 96 97 98 99 100 101 102 103 104 105 106 107 108 109 110 111 112 113 114 115 116 117 118 119 120 121 122 123 124 125 126 127 128 129 130 131 132 133 134 135 136 137 138 139 140 141 142 143 144 145 146 147 148 149 150 151 152 153 154 155 156 157 158 159 160 161 162 163 164 165 166 167 168 169 170 171 172 173 174 175 176 177 178 179 180 181 182 183 184 185 186 187 188 189 190 191 192 193 194 195 196 197 198 199 200 201 202 203 204 205 206 207 208 209 210 211 212 213 214 215 216 217 218 | #include "model.h" #include "QTextStream" #include <QDebug> #include "material.h" model::model(QString path){ QFile file(path); if(!file.open(QIODevice::ReadOnly)){ printf("faild\n"); return; } QTextStream in(&file); in.setCodec("UTF-8"); int pocnt=0,tecnt=0,ncnt=0; QString mtlpath=""; shared_ptr<material> mat[15]; int matIndex=0; while(!in.atEnd()) { QString onecount = in.readLine(); std::string str=onecount.toStdString(); /*读取材质文件名称*/ if(str[0]=='m') { QStringList list = path.split("/"); for(int i=0;i<list.size()-1;i++) mtlpath=mtlpath.append(list[i]+"/"); for(int i=7;i<onecount.size();i++) mtlpath=mtlpath.append(str[i]); } /*读取顶点*/ if(str[0]=='v'&& str[1]==' ') { pocnt++; int index=0;float num[4]={0,0,0,0};int flag[4]={1,1,1,1}; bool po=false;int bit=0; for(unsigned int i=1;i<str.length();i++) { if(str[i]==' ') { index++; po=false; bit=0; } else if(str[i]>='0'&&str[i]<='9') { if(po==false){ num[index]=num[index]*10+str[i]-'0'; } else{ num[index]+=(str[i]-'0')*powf(10,-bit); bit++; } } else if(str[i]=='.') { po=true; bit=1; } else if(str[i]=='-')flag[index]=-1; } point[pocnt]=vec3(num[1]*flag[1],num[2]*flag[2],num[3]*flag[3]); } /*读取纹理坐标*/ if(str[0]=='v'&& str[1]=='t') { tecnt++; int index=0;float num[3]={0,0,0}; bool po=false;int bit=0; for(unsigned int i=2;i<str.length();i++) { if(str[i]==' ') { index++; po=false; bit=0; } else if(str[i]>='0'&&str[i]<='9') { if(po==false){ num[index]=num[index]*10+str[i]-'0'; } else{ num[index]+=(str[i]-'0')*powf(10,-bit); bit++; } } else if(str[i]=='.') { po=true; bit=1; } } tex[tecnt]=vec3(num[1],num[2],0); } /*读取法向量*/ if(str[0]=='v'&& str[1]=='n') { ncnt++; int index=0;float num[4]={0,0,0,0};int flag[4]={1,1,1,1}; bool po=false;int bit=0; for(unsigned int i=2;i<str.length();i++) { if(str[i]==' ') { index++; po=false; bit=0; } else if(str[i]>='0'&&str[i]<='9') { if(po==false){ num[index]=num[index]*10+str[i]-'0'; } else{ num[index]+=(str[i]-'0')*powf(10,-bit); bit++; } } else if(str[i]=='.') { po=true; bit=1; } else if(str[i]=='-')flag[index]=-1; } nor[ncnt]=vec3(num[1]*flag[1],num[2]*flag[2],num[3]*flag[3]); } /*读取材质*/ else if(str[0]=='u') { matIndex++; char mtlname[100]; for(int i=7;i<onecount.size();i++) mtlname[i-7]=str[i]; mtlname[onecount.size()-7]='\0'; QFile mtlfile(mtlpath); if(!mtlfile.open(QIODevice::ReadOnly)){ printf("faild\n"); return; } QTextStream in2(&mtlfile); bool found=false; while(!in2.atEnd()) { QString onecount2 = in2.readLine(); std::string str2=onecount2.toStdString(); if(str2[0]=='n') { char mtlname2[100]; for(int i=7;i<onecount2.size();i++) mtlname2[i-7]=str2[i]; mtlname2[onecount2.size()-7]='\0'; if(strcmp(mtlname,mtlname2)==0) found=true; } if(str2[0]=='m'&&found==true) { QString texpath=""; for(int i=7;i<onecount2.size();i++) { if(str2[i]=='\') { texpath.append("/"); i++; } else texpath.append(str2[i]); } mat[matIndex]=make_shared<lambertianImage>(texpath,1,1); break; } } mtlfile.close(); } /*读取面*/ else if(str[0]=='f') { int pointIndex=0,infIndex,num; for(unsigned int i=1;i<=str.length();i++) { if(i==str.length()){ inf[pointIndex][infIndex]=num; break; } if(str[i]==' ') { if(pointIndex>0)inf[pointIndex][infIndex]=num; pointIndex++; infIndex=1; num=0; } else if(str[i]>='0'&&str[i]<='9'){ num=num*10+str[i]-'0'; } else if(str[i]=='/'){ inf[pointIndex][infIndex]=num; infIndex++; num=0; } } for(int i=3;i<=pointIndex;i++) { /*1、i-1、i三个点*/ vec3 normal=(nor[inf[1][3]]+nor[inf[i-1][3]]+nor[inf[i][3]])/3; tg[faceCnt]=make_shared<triangle> (point[inf[1][1]],point[inf[i-1][1]],point[inf[i][1]], normal,mat[matIndex], tex[inf[1][2]][0],tex[inf[1][2]][1], tex[inf[i-1][2]][0],tex[inf[i-1][2]][1], tex[inf[i][2]][0],tex[inf[i][2]][1] ); faceCnt++; } } } file.close(); } |
接下来我们在场景中导入一下自己的obj模型文件,注意把附带的mtl格式编辑好,便可以渲染出如图的效果:
You may also Like

C++光线追踪渲染器终结版

1 Comment
zmytql
14th 8 月 2021 - 下午2:45看看zmy哥哥在干什么