引言
在前面几节,我们完成了若干项任务:定义着色器实例、搭建管线、绑定SBT、完成模型纹理读入、完成二次弹射的追踪shader、完成实时降噪。好像我们的光追渲染器已经成型了,然而事实上还差的远,因为我们现在的光追就是:光线第一次求交得到命中物体,然后第二次直接定向找光源,这样弹射两次就结束了。真正的光追绝对不是弹射两次光线就能计算出结果的,因为这样的算法与光栅化差异不大(光栅化也是弹射两次,区别在于光栅化是从光源到物体再到眼睛,这里的光追是从眼睛到物体再直接追踪到光源)。因此我们要将其拓展为多次弹射、对路径作渲染方程积分估计的真正的光追。
不过从本节开始,已经脱离了官方课程optix course的范畴了,这意味着从本节开始每一句代码都需要自己摸索,并适当的参考pbrt、mitsuba等开源渲染器中的一些架构和api,因此本节开始的代码难免会出现一些小bug,如果大家发现了可以在评论区指出,万分感谢。
Part1. 理论准备
回忆一下我们在C++光追渲染器中是怎么定义光追程序的。我们定义了一个Ray结构体,用来记录当前追踪的光线的起点、终点;又定义了一个Intersection结构体,用来记录与三角面求交得到的交点位置、法线、模型材质等等信息。同理,optix路径追踪也离不开这俩东西,一会儿我们也要在shader里定义它们。
然后我们在C++光追渲染器写了一个递归程序,从相机视口的某个像素出发,递归式地找到每一个交点、直到最后找到光源(或求交失败)作为最深一层,然后我们从最深一层开始赋予光照能量,再回溯去求每一层的能量,最后得到有多少能量被相机捕捉到。我们可以分析一下中间的能量计算过程:
假如我们从某像素射出一根光线,先打到物体A,再打到物体B,再打到物体C,最后追踪到光源D,那么该像素对应的这根光线最终是多少能量呢?(下文用e表示自发光,用f表示渲染方程的积分部分)
按照正常的光路顺序,光线从D发出,能量是eD,打到C表面上后调用C的渲染方程,可以得到出射光强是eC + fC * eD,然后打到B表面调用渲染方程,得到出射光是eB + fB(eC + fC * eD),以此类推……便可以得到e = eA + fA(eB + fB(eC + fC * eD))。所以我们倾向于给光追过程编写一个递归程序,先递归地找到最深一层(D)的出射能量,得到D的能量后回溯到C层计算C的出射能量,再回溯到B计算B的出射能量,以此类推……所以大部分光追程序都是写成递归的形式。
然而放在optix渲染器里就不一样了。尽管如今cuda已经支持递归了,但是在gpu端写递归函数终归会拖累性能,而且容易出现栈溢出。因此我们不得不将光追迭代从递归函数 强行改成for循环迭代的方式。那么问题来了,计算光照我们得从最深一层D开始计算,然后再算C、B、A,而for循环只能正向从A开始一步一步求交,当求交到D时,ABC的信息早就被抹了,还怎么一步步往回代入计算呢?
这里我们就将刚才的公式拆解一下:
e = eA + fA(eB + fB(eC + fC * eD))
e = eA + fA * eB + fA * fB * eC + fA * fB * fC * eD
看到这里,算法就很明朗了。我们直接在for循环中做弹射(每一步弹一次并求交),维护一个e作为总能量(初始=0),维护一个accum值作bsdf函数的累乘值(初始=1)。每求交到一个物体,我们直接给e+=该材质自发光*accum的值,然后给accum乘一个该材质的bsdf函数值,进入下一次迭代就可以了。
明白这部分后,基本就没有什么要补充的知识了,我们直接动工!
Part.2 朴素路径追踪shader
首先我们创建一个MyInteraction.h文件,放一下我们要定义的Ray和Interaction:
MyInteraction.h:
#include "gdt/math/vec.h"
#include "LaunchParams.h"
#include "math.h"

using namespace osc;

struct Ray
{
    vec3f origin;
    vec3f direction;
    float tmax = FLT_MAX;
};

struct Interaction
{
    float bias = 0.001f;
    float distance;
    vec3f position;
    vec3f geomNormal;
    vec3f mat_color;

    __forceinline__ __device__ Ray spawn_ray(const vec3f& wi) const
    {
        vec3f N = geomNormal;
        if (dot(wi, geomNormal) < 0.0f)
        {
            N = -geomNormal;
        }

        Ray ray;
        ray.origin = position + N * bias;
        ray.direction = wi;
        ray.tmax = FLT_MAX;
        return ray;
    }
};
这里参考了一个KDRay的架构设计,非常感谢这位大佬的分享 : )
首先定义一个Ray结构体,origin表示射线起点,direction表示射线方向,tmax表示射线能追踪的最远距离;然后定义一个Interaction结构体来记录求交信息,distance表示两次求交点之间的距离,position表示交点位置,geomNormal表示交点的法线,mat_color表示交点的材质颜色(这一节我们的bsdf都是超级简单的纯色材质)。额外定义的spawn_ray函数讲的是,根据出射方向来创建一个Ray,bias就是为了防止暗疮现象而加的出射偏移。
接下来我们来修改着色器。因为目前我们不需要阴影射线,所以我们直接把shadow相关的shader直接置空。然后我们看一下Raygen Shader:
extern "C" __global__ void __raygen__renderFrame()
    {
        // compute a test pattern based on pixel ID
        const int ix = optixGetLaunchIndex().x;
        const int iy = optixGetLaunchIndex().y;
        const auto& camera = optixLaunchParams.camera;

        int numPixelSamples = optixLaunchParams.numPixelSamples;

        PRD prd;

        vec3f pixelColor = 0.f;
        // normalized screen plane position, in [0,1]^2
        vec2f screen(vec2f(ix, iy) / vec2f(optixLaunchParams.frame.size));

        // generate ray direction
        vec3f rayDir = normalize(camera.direction
            + (screen.x - 0.5f) * camera.horizontal
            + (screen.y - 0.5f) * camera.vertical);

        for (int sampleID = 0; sampleID < numPixelSamples; sampleID++) {
            Ray myRay;
            myRay.origin = camera.position;
            myRay.direction = rayDir;
            vec3f radiance = 0.0f;
            vec3f accum = 1.0f;
            for (int bounces = 0; ; ++bounces)
            {
                if (bounces >= optixLaunchParams.maxBounce) {
                    radiance = 0.0f;
                    break;
                }
                Interaction isect;
                isect.distance = 0;
                unsigned int isectPtr0, isectPtr1;
                packPointer(&isect, isectPtr0, isectPtr1);
                optixTrace(optixLaunchParams.traversable,
                    myRay.origin,
                    myRay.direction,
                    0,    // tmin
                    1e20f,  // tmax
                    0.0f,   // rayTime
                    OptixVisibilityMask(255),
                    OPTIX_RAY_FLAG_DISABLE_ANYHIT,//OPTIX_RAY_FLAG_NONE,
                    RADIANCE_RAY_TYPE,            // SBT offset
                    RAY_TYPE_COUNT,               // SBT stride
                    RADIANCE_RAY_TYPE,            // missSBTIndex
                    isectPtr0, isectPtr1);
                if (isect.distance == FLT_MAX)
                {
                    radiance += vec3f(1.0f) * accum;
                    break;
                }
                radiance += 0.0f;
                accum.x *= isect.mat_color.x;
                accum.y *= isect.mat_color.y;
                accum.z *= isect.mat_color.z;
                // 下一次反弹方向
                vec3f wi;
                vec3f rnd;
                prd.random.init(optixLaunchParams.frame.frameID * 234834 % 32849 + ix * 385932 % 82921,
                    optixLaunchParams.frame.frameID * 348593 % 43832 + iy * 324123 % 23415);
                rnd.x = prd.random() * 2 - 1;
                prd.random.init(optixLaunchParams.frame.frameID * 972823 % 12971 + ix * 743782 % 82013,
                    optixLaunchParams.frame.frameID * 893022 % 28191 + iy * 918212 % 51321);
                rnd.y = prd.random() * 2 - 1;
                prd.random.init(optixLaunchParams.frame.frameID * 383921 % 48839 + ix * 572131 % 47128,
                    optixLaunchParams.frame.frameID * 389291 % 29301 + iy * 716271 % 63291);
                rnd.z = prd.random() * 2 - 1;
                wi = isect.geomNormal + normalize(rnd);
                wi = normalize(wi);
                myRay = isect.spawn_ray(wi);
            }
            pixelColor += radiance;
        }

        vec4f rgba(pixelColor / numPixelSamples, 1.f);
        rgba.x = powf(rgba.x, 1 / 2.2f);
        rgba.y = powf(rgba.y, 1 / 2.2f);
        rgba.z = powf(rgba.z, 1 / 2.2f);
        if (rgba.x > 1)rgba.x = 1.0f;
        if (rgba.y > 1)rgba.y = 1.0f;
        if (rgba.z > 1)rgba.z = 1.0f;
        if (rgba.w > 1)rgba.w = 1.0f;

        // and write/accumulate to frame buffer ...
        const uint32_t fbIndex = ix + iy * optixLaunchParams.frame.size.x;
        if (optixLaunchParams.frame.frameID > 0) {
            rgba
                += float(optixLaunchParams.frame.frameID)
                * vec4f(optixLaunchParams.frame.colorBuffer[fbIndex]);
            rgba /= (optixLaunchParams.frame.frameID + 1.f);
        }
        optixLaunchParams.frame.colorBuffer[fbIndex] = (float4)rgba;
    }
这部分程序还是比较好读的,首先照常根据屏幕像素坐标,得到第一根出射光线的起始坐标和方向,这回我们把它的信息装入自定义的Ray中。
然后第一层循环是采样循环,表示同一个像素要采样多次,这里我们先把总能量radiance和bsdf积累量accum这些变量初始化好;第二层循环就是我们的光路迭代循环,表示现在追踪到了第几层。首先定义一个Intersection准备装求交信息,我们将这个Intersection的指针装入gpu的0号、1号槽位,用来接受hit shader和miss shader传递的信息。然后我们便开始发射射线!在miss shader和hit shader会把求交点的位置、法线、材质颜色都写入Intersection里。这样我们就得到了这一轮的所有求交信息,并更新radiance、accum这些变量。同时,我们也要根据法线和bsdf信息来决定下一次的弹射方向,因为我们这一节都是纯粗糙diffuse材质,因此我们直接进行均匀半球采样,用prd来撒种子求随机数并决定采样方向(随机数方案我目前是乱写的,之后会介绍采样器)。有了这个方向,我们便可以用spawn_ray函数来得到下一次弹射的Ray信息,进入下一个迭代。
我们预设天空是光源。当弹射次数超过预置次数时,表示这根光线追踪不到光源,因此直接给能量置0;当追踪到无限远的天空光源时,就直接给天空自发光设为天光能量值(例如rgb(1,1,1)),然后用我们前面说的公式就可以积累出最终的光线颜色。
对多次采样的结果进行取平均,然后要对颜色做一次gamma矫正(不然整体会偏暗),然后再处理溢出情况,最后和之前的帧结果进行混合,完成实时降噪。
怎么样,思路很清晰吧?我们再来看一下miss shader,更简单:
extern "C" __global__ void __miss__radiance()
    {
        uint32_t isectPtr0 = optixGetPayload_0();
        uint32_t isectPtr1 = optixGetPayload_1();
        Interaction* interaction = reinterpret_cast<Interaction*>(unpackPointer(isectPtr0, isectPtr1));
        interaction->distance = FLT_MAX;
    }
当miss shader被调用,说明该光线已经打到无限远的天空上了。因此我们取出0号、1号槽装的intersection指针,将距离信息(FLT_MAX无限远)写入,这样raygen shader的光路迭代部分就知道这一轮弹射打到天空光源了。
再来看一下closesthit shader:
extern "C" __global__ void __closesthit__radiance()
    {
        uint32_t isectPtr0 = optixGetPayload_0();
        uint32_t isectPtr1 = optixGetPayload_1();
        Interaction* interaction = reinterpret_cast<Interaction*>(unpackPointer(isectPtr0, isectPtr1));
        const TriangleMeshSBTData& sbtData
            = *(const TriangleMeshSBTData*)optixGetSbtDataPointer();
        PRD& prd = *getPRD<PRD>();

        // ------------------------------------------------------------------
        // gather some basic hit information
        // ------------------------------------------------------------------
        const int   primID = optixGetPrimitiveIndex();
        const vec3i index = sbtData.index[primID];
        const float u = optixGetTriangleBarycentrics().x;
        const float v = optixGetTriangleBarycentrics().y;

        // ------------------------------------------------------------------
        // compute normal, using either shading normal (if avail), or
        // geometry normal (fallback)
        // ------------------------------------------------------------------
        const vec3f& A = sbtData.vertex[index.x];
        const vec3f& B = sbtData.vertex[index.y];
        const vec3f& C = sbtData.vertex[index.z];
        vec3f Ng = cross(B - A, C - A);
        vec3f Ns = (sbtData.normal)
            ? ((1.f - u - v) * sbtData.normal[index.x]
                + u * sbtData.normal[index.y]
                + v * sbtData.normal[index.z])
            : Ng;

        const vec3f pos = (1.f - u - v) * A + u * B + v * C;
        interaction->position = pos;
        // ------------------------------------------------------------------
        // face-forward and normalize normals
        // ------------------------------------------------------------------
        const vec3f rayDir = optixGetWorldRayDirection();

        if (dot(rayDir, Ng) > 0.f) Ng = -Ng;
        Ng = normalize(Ng);

        if (dot(Ng, Ns) < 0.f)
            Ns -= 2.f * dot(Ng, Ns) * Ng;
        Ns = normalize(Ns);

        interaction->geomNormal = Ns;
        // ------------------------------------------------------------------
        // compute diffuse material color, including diffuse texture, if
        // available
        // ------------------------------------------------------------------
        vec3f diffuseColor = sbtData.color;
        if (sbtData.hasTexture && sbtData.texcoord) {
            const vec2f tc
                = (1.f - u - v) * sbtData.texcoord[index.x]
                + u * sbtData.texcoord[index.y]
                + v * sbtData.texcoord[index.z];

            vec4f fromTexture = tex2D<float4>(sbtData.texture, tc.x, tc.y);
            diffuseColor *= (vec3f)fromTexture;
        }

        // start with some ambient term
        vec3f pixelColor = (0.1f + 0.2f * fabsf(dot(Ns, rayDir))) * diffuseColor;
        interaction->mat_color = pixelColor;
    }
别看hit shader这么长,90%都是上一节写的计算插值法线、计算插值uv、获取纹理、代入lambert模型计算光照颜色。只是这里我们需要将求交点坐标、法线以及最终的材质颜色写入Intersection中即可。(这里我的设计有点不严谨,严格意义上讲,计算bsdf的代码不应该放在hit shader,因为bsdf依赖于入射、出射两根光线的信息,然而调用hit shader的时候还没开始采样出射光线。只是因为本例是diffuse模型,出射光对bsdf值无贡献,所以我才能把bsdf的计算放在hit shader中。日后但凡有了新材质,肯定都要把bsdf计算搬到光路迭代的主循环中去算)
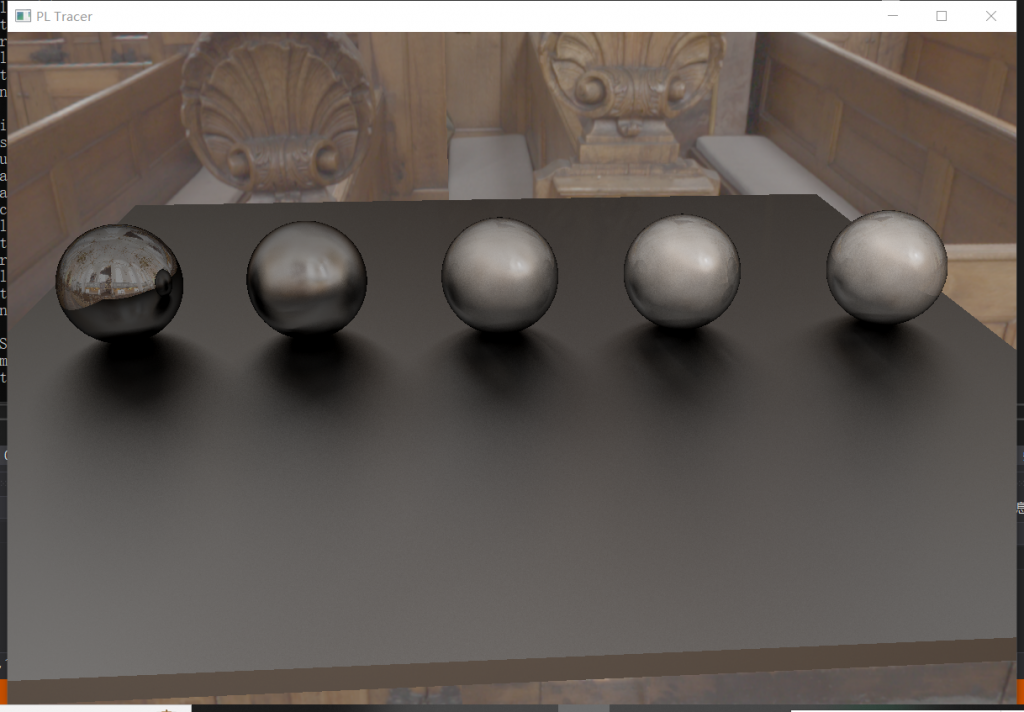
最后我们把弹射深度设为5~10,便可以看到有深度的光追了。接下来我们导入一个车辆的渲染场景:
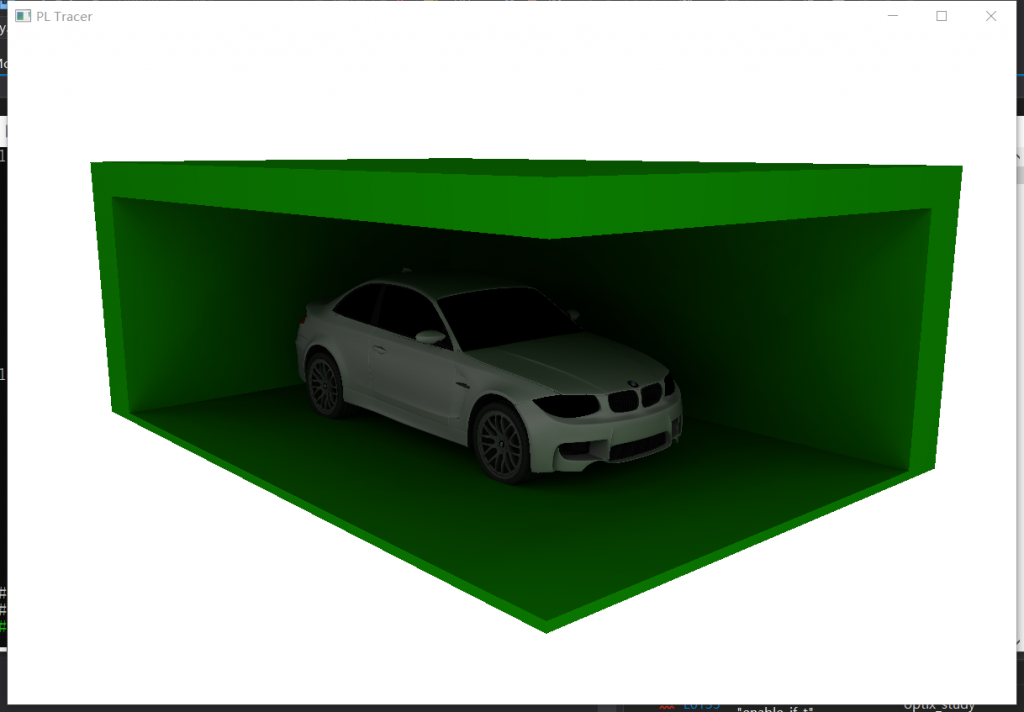

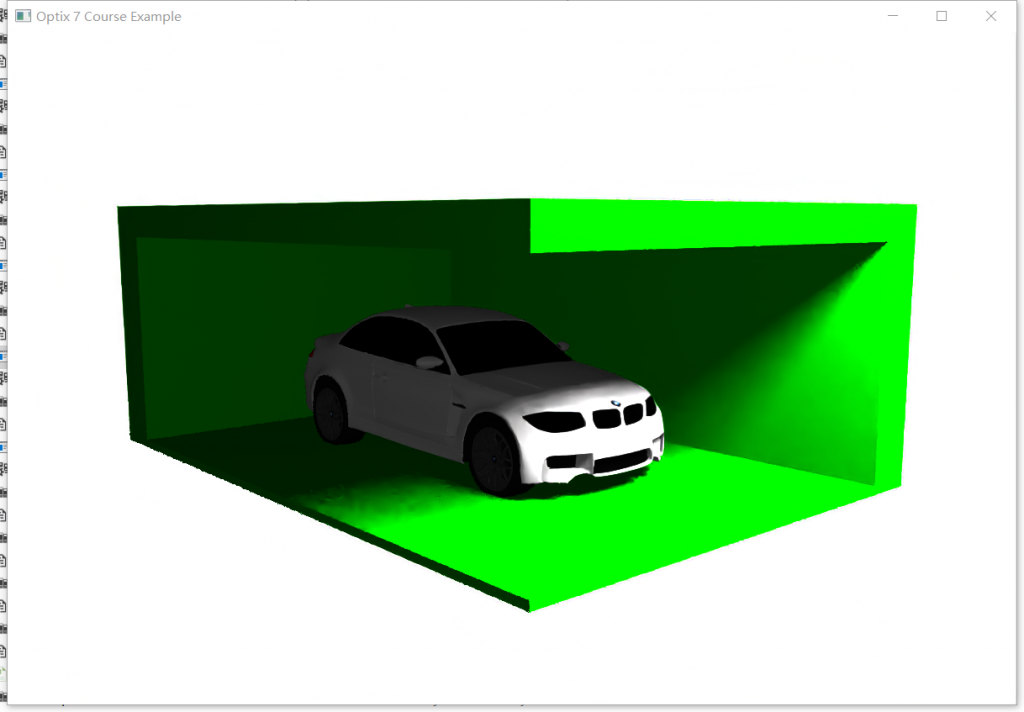
上图是我们刚写的路径追踪效果,下图是之前两次弹射的光追效果。很明显,上图的阴影非常自然、柔和、有层次感,而且车身、车前引擎盖也有很多阴影细节。然而下图的阴影就全靠一个虚构的光源来呈现,很不自然,尤其是内部的阴影没有越来越暗的层次感,比较失真。
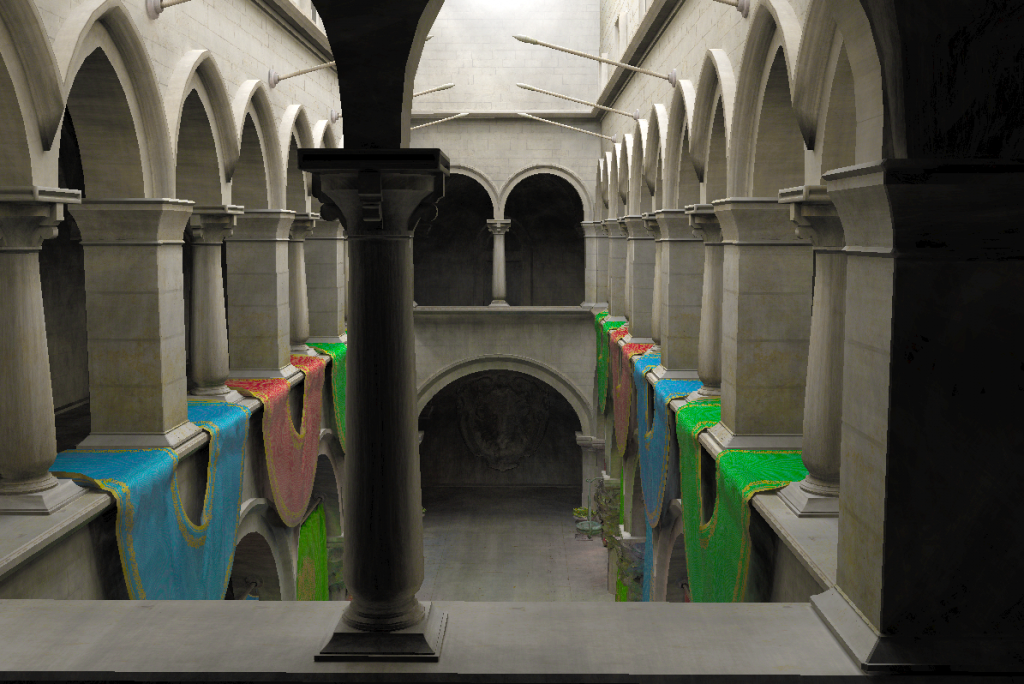
接下来我还想看看sponza的效果,但是sponza是一个半封闭的场景,进光量很少,路径追踪的结果会整体偏暗。因此我自做主张,让diffuse材质有一个微弱的自发光,从而让场景稍微亮一些:

Part.3 屏幕后处理(亮度、饱和度、对比度)
上图这个曝光度还是明显不够,因此我们考虑加入一下饱和度、亮度、对比度的后处理功能。创建PostProcess.h:
#pragma once
#include <cuda_runtime.h>
struct BGR
{
    float b;
    float g;
    float r;
};

struct HSV
{
    int h;
    float s;
    float v;
};

extern "C" __device__ bool IsEquals(float val1, float val2)
{
    return val1 > val2 ? val1 - val2 < 0.001f : val2 - val1 < 0.001f;
}

extern "C" __device__ float MAX(float a, float b) {
    return a > b ? a : b;
}
extern "C" __device__ float MIN(float a, float b) {
    return a < b ? a : b;
}

// BGR(BGR: 0~255)转HSV(H: [0~360), S: [0~1], V: [0~1])
extern "C" __device__ void BGR2HSV(BGR& bgr, HSV& hsv)
{
    float b, g, r;
    float h, s, v;
    float min, max;
    float delta;
    b = bgr.b;
    g = bgr.g;
    r = bgr.r;
    if (r > g)
    {
        max = MAX(r, b);
        min = MIN(g, b);
    }
    else
    {
        max = MAX(g, b);
        min = MIN(r, b);
    }
    v = max;
    delta = max - min;

    if (IsEquals(max, 0))
        s = 0.0;
    else
        s = delta / max;

    if (max == min)
        h = 0.0;
    else{
        if (IsEquals(r, max) && g >= b)
            h = 60 * (g - b) / delta + 0;
        else if (IsEquals(r, max) && g < b)
            h = 60 * (g - b) / delta + 360;
        else if (IsEquals(g, max))
            h = 60 * (b - r) / delta + 120;
        else if (IsEquals(b, max))
            h = 60 * (r - g) / delta + 240;
    }
    hsv.h = (int)(h + 0.5);
    hsv.h = (hsv.h > 359) ? (hsv.h - 360) : hsv.h;
    hsv.h = (hsv.h < 0) ? (hsv.h + 360) : hsv.h;
    hsv.s = s;
    hsv.v = v;
}

// HSV转BGR
extern "C" __device__ void HSV2BGR(HSV& hsv, BGR& bgr)
{
    int h = hsv.h;
    float s = hsv.s;
    float v = hsv.v;
    if (s > 1.0f)s = 1.0f;
    if (v > 1.0f)v = 1.0f;
    float b = 0.0;
    float g = 0.0;
    float r = 0.0;

    int flag = (int)(h / 60.0);
    float f = h / 60.0 - flag;
    float p = v * (1 - s);
    float q = v * (1 - f * s);
    float t = v * (1 - (1 - f) * s);
    switch (flag)
    {
    case 0:
        b = p;
        g = t;
        r = v;
        break;
    case 1:
        b = p;
        g = v;
        r = q;
        break;
    case 2:
        b = t;
        g = v;
        r = p;
        break;
    case 3:
        b = v;
        g = q;
        r = p;
        break;
    case 4:
        b = v;
        g = p;
        r = t;
        break;
    case 5:
        b = q;
        g = p;
        r = v;
        break;
    default:
        break;
    }

    bgr.b = b < 1.0f ? b : 1.0f;
    bgr.g = g < 1.0f ? g : 1.0f;
    bgr.r = r < 1.0f ? r : 1.0f;
}

extern "C" __device__ void Contrast(BGR & bgr, float con, float thre)
{
    bgr.r = bgr.r + (bgr.r - thre) * con;
    bgr.g = bgr.g + (bgr.g - thre) * con;
    bgr.b = bgr.b + (bgr.b - thre) * con;

    bgr.b = bgr.b < 1.0f ? bgr.b : 1.0f;
    bgr.g = bgr.g < 1.0f ? bgr.g : 1.0f;
    bgr.r = bgr.r < 1.0f ? bgr.r : 1.0f;

    bgr.b = bgr.b > 0.0f ? bgr.b : 0.0f;
    bgr.g = bgr.g > 0.0f ? bgr.g : 0.0f;
    bgr.r = bgr.r > 0.0f ? bgr.r : 0.0f;
}
原理还是蛮简单的。对于亮度和饱和度,直接把RGB转化成HSV格式调整s和v,然后再转回RGB格式;对于对比度,直接对每个像素进行阈值间距缩放即可。
在launchParams的frame中再定义一个renderBuffer;在SampleRenderer再定义、注册一个renderBuffer,用来存经过后处理的图片。接下来我们稍微改写一下RaygenShader最后的部分:
optixLaunchParams.frame.colorBuffer[fbIndex] = (float4)rgba;
        HSV hsv; BGR bgr; bgr.r = rgba.x; bgr.g = rgba.y; bgr.b = rgba.z;
        BGR2HSV(bgr, hsv);
        hsv.v += optixLaunchParams.lightness_change;
        if (hsv.s >= 0.05f)
            hsv.s += optixLaunchParams.saturate_change;
        HSV2BGR(hsv, bgr);
        Contrast(bgr, optixLaunchParams.contrast_change, 0.5f);
        rgba.x = bgr.r; rgba.y = bgr.g; rgba.z = bgr.b;
        optixLaunchParams.frame.renderBuffer[fbIndex] = (float4)rgba;
这样朴素图像的结果就会写进colorBuffer,经过后处理的图像结果写进renderBuffer。
void SampleRenderer::downloadPixels(vec4f h_pixels[])
  {
      renderBuffer.download(h_pixels,
          launchParams.frame.size.x * launchParams.frame.size.y);
  }
改写一下downloadPixels函数,把下载colorBuffer改为下载renderBuffer。
这样我们调节一下亮度、饱和度、对比度,就可以看到十分惊艳的效果了:
我们还是要多注意阴影细节,对比路径追踪与二次弹射之间的光影差距,就知道为什么之前的渲染器完全不配称作是一个完整的光追渲染器了。
Part4. 环境贴图
现在我们实现了diffuse材质的光追,可以看到效果还不错。当然我们肯定不能止步于如此“hello world”的材质实例,接下来我们要创建一些透射材质和金属反射材质。但是现在我们的天空是一片白,很难看出材质的透射、反射效果,因此我们考虑在这一步做一下环境贴图的功能。
首先我们给model类追加一个envmap成员,并在model.cpp中编写一个读取环境贴图的函数:
int loadEnvmap(Model* model, const std::string& Path) {
        if (Path == "")
            return -1;
        vec2i res;
        int comp;
        unsigned char* image = stbi_load(Path.c_str(),
            &res.x, &res.y, &comp, STBI_rgb_alpha);
        Texture* texture = new Texture;
        texture->resolution = res;
        texture->pixel = (uint32_t*)image;
        model->envmap = texture;
        return 1;
    }
因为环境贴图一般是在miss shader中调用的,因此我们考虑让miss shader的SBT record中绑定环境贴图:
struct __align__( OPTIX_SBT_RECORD_ALIGNMENT ) MissRecord
  {
    __align__( OPTIX_SBT_RECORD_ALIGNMENT ) char header[OPTIX_SBT_RECORD_HEADER_SIZE];
    cudaTextureObject_t envmap;
  };
然后需要在createTexture的时候把环境贴图一起创建,放到textureObjects的末尾:
void SampleRenderer::createTextures()
  {
      int numTextures = (int)model->textures.size();

      textureArrays.resize(numTextures + 1);
      textureObjects.resize(numTextures + 1);

      for (int textureID = 0; textureID < numTextures + 1; textureID++) {
          Texture *texture;
          if (textureID != numTextures)
            texture = model->textures[textureID];
          else
            texture = model->envmap;

          cudaResourceDesc res_desc = {};
...
在绑定miss shader实例的SBT的时候,我们要把这张环境贴图的textureObjects放到record中:
std::vector<MissRecord> missRecords;
    for (int i=0;i<missPGs.size();i++) {
      MissRecord rec;
      OPTIX_CHECK(optixSbtRecordPackHeader(missPGs[i],&rec));
      rec.envmap = textureObjects[(int)model->textures.size()];
      missRecords.push_back(rec);
    }
这样环境贴图就成功绑到miss shader record上了。接下来我们编写一下miss shader的代码:
static __device__ vec2f sampling_equirectangular_map(vec3f n) {
        float u = atan(n.z / n.x);
        u = (u + PI) / (2.0 * PI);

        float v = asin(n.y);
        v = (v * 2.0 + PI) / (2.0 * PI);
        v = 1.0f - v;

        return vec2f(u, v);
    }
extern "C" __global__ void __miss__radiance()
    {
        uint32_t isectPtr0 = optixGetPayload_0();
        uint32_t isectPtr1 = optixGetPayload_1();
        Interaction* interaction = reinterpret_cast<Interaction*>(unpackPointer(isectPtr0, isectPtr1));
        interaction->distance = FLT_MAX;

        const cudaTextureObject_t& sbtData
            = *(const cudaTextureObject_t*)optixGetSbtDataPointer();
        vec3f ray_dir = optixGetWorldRayDirection();
        vec2f uv = sampling_equirectangular_map(ray_dir);
        vec4f fromTexture = tex2D<float4>(sbtData, uv.x, uv.y);
        interaction->mat_color = (vec3f)fromTexture;
    }
extern "C" __global__ void __raygen__renderFrame()
    {
        // compute a test pattern based on pixel ID
        const int ix = optixGetLaunchIndex().x;
        const int iy = optixGetLaunchIndex().y;
...
                if (isect.distance == FLT_MAX)
                {
                    if (bounces > 0)
                        radiance += isect.mat_color * accum;
                    else
                        radiance += isect.mat_color * accum / 3.0f;
                    break;
                }
通过optixGetSbtDataPointer()获得miss shader record上挂载的环境贴图,根据自己写的sampling_equirectangular_map函数,将射线方向转化成环境贴图的采样uv,完成采样、获得环境贴图上对应像素的光照数据,将光照信息写入mat_color中。在主迭代循环中,检测到射线这次检测的distance为FLT_MAX表示求交失败,意味着命中了环境贴图(即求交到主光源),那么直接取光色并返回。这里为了防止环境贴图本身的颜色过曝,所以玩了个trick,如果我们的射线刚弹1次就弹到了环境贴图上,那么就给它的光强削弱3倍。这样当我们直接看向环境贴图的时候,它是不过曝的;但是它射到其他物体上的光线强度依旧保持高水平。
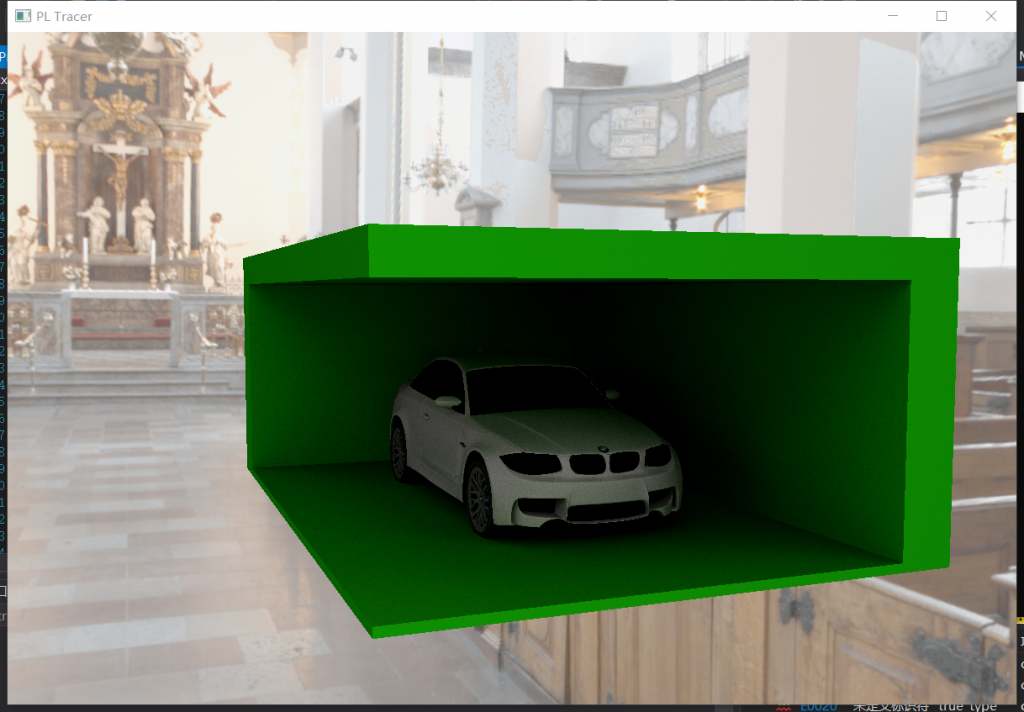
有了环境贴图,我们可以开始制作新材质了。
Part5. 材质体系
现在我们要引入多种材质,那么就需要重新规划一下材质相关的架构,尽量将材质信息相关的内容封装起来,避免混乱。
新建一个Material_def.h
#pragma once
#include "gdt/math/vec.h"
#include <cuda_runtime.h>

using namespace gdt;

enum material_kind
{
    DIFFUSE, METAL
};

struct material_mes {
    material_kind mat_kind;

    vec3f diffuse;
    vec3f emitter = 0;

    int diffuseTextureID{ -1 };
    cudaTextureObject_t diffuse_texture;
};
这里我们定义一个material_mes结构体,记录所有材质信息。包括但不限于材质种类(漫反射、镜面、透射、日后会加入的disney微表面)、漫射颜色、自发光强度、贴图编号、贴图实例。
首先我们知道,每一个TriangleMesh对应一个材质,因此我们改写一下TriangleMesh的成员:
struct TriangleMesh {
        std::vector<vec3f> vertex;
        std::vector<vec3f> normal;
        std::vector<vec2f> texcoord;
        std::vector<vec3i> index;

        // material data:
        material_mes mat_mes;
    };
然后我们改写一下objLoader的逻辑,先判断材质类型,如果是metal、dielectric类型的材质就不需要读取mtl文件了我们直接自定义属性;如果是diffuse还照常读mtl文件。
Model* loadOBJ(const std::string& objFile, material_kind mat_kind)
    {
        Model* model = new Model;
...
        if (materials.empty() && mat_kind == DIFFUSE)
            throw std::runtime_error("could not parse materials ...");
...
            for (int materialID : materialIDs) {
                if (materialID == -1)
                    continue;
                TriangleMesh* mesh = new TriangleMesh;

                for (int faceID = 0; faceID < shape.mesh.material_ids.size(); faceID++) {
                    if (shape.mesh.material_ids[faceID] != materialID) continue;
                    tinyobj::index_t idx0 = shape.mesh.indices[3 * faceID + 0];
                    tinyobj::index_t idx1 = shape.mesh.indices[3 * faceID + 1];
                    tinyobj::index_t idx2 = shape.mesh.indices[3 * faceID + 2];

                    vec3i idx(addVertex(mesh, attributes, idx0, knownVertices),
                        addVertex(mesh, attributes, idx1, knownVertices),
                        addVertex(mesh, attributes, idx2, knownVertices));
                    mesh->index.push_back(idx);
                    if (mat_kind == DIFFUSE) {
                        mesh->mat_mes.diffuse = (const vec3f&)materials[materialID].diffuse;
                        mesh->mat_mes.diffuseTextureID = loadTexture(model,
                            knownTextures,
                            materials[materialID].diffuse_texname,
                            modelDir);
                    }
                    mesh->mat_mes.mat_kind = mat_kind;
                }

                if (mesh->vertex.empty())
                    delete mesh;
                else
                    model->meshes.push_back(mesh);
            }
        }
...
    }
后面的赋值工作,我们赋值到TriangleMesh的mat_mes中,这样每个拆分好的TriangleMesh都有一个完整的材质描述了。
现在我们想要把TriangleMesh的mat_mes绑定到record中,因此我们的record成员也要做一个增添:
struct TriangleMeshSBTData {
        vec3f* vertex;
        vec3f* normal;
        vec2f* texcoord;
        vec3i* index;
        material_mes mat_mes;
    };
现在我们来绑定一下SBT,把各个TriangleMesh的材质信息绑定到record中:
int numObjects = (int)model->meshes.size();
    std::vector<HitgroupRecord> hitgroupRecords;
    for (int meshID = 0; meshID < numObjects; meshID++) {
        for (int rayID = 0; rayID < RAY_TYPE_COUNT; rayID++) {
            auto mesh = model->meshes[meshID];

            HitgroupRecord rec;
            OPTIX_CHECK(optixSbtRecordPackHeader(hitgroupPGs[rayID], &rec));
            rec.data.mat_mes = mesh->mat_mes;
            rec.data.index = (vec3i*)indexBuffer[meshID].d_pointer();
            rec.data.vertex = (vec3f*)vertexBuffer[meshID].d_pointer();
            rec.data.normal = (vec3f*)normalBuffer[meshID].d_pointer();
            rec.data.texcoord = (vec2f*)texcoordBuffer[meshID].d_pointer();
            if (rec.data.mat_mes.diffuseTextureID != -1)
                rec.data.mat_mes.diffuse_texture = textureObjects[rec.data.mat_mes.diffuseTextureID];
            hitgroupRecords.push_back(rec);
        }
    }
好了,这样我们就把mat_mes的信息全部绑定好了,在shader中我们可以获取交点所在材质的材质类型、diffuse、贴图指针和贴图编号,方便计算bsdf和出射方向。
接下来我们来改shader。首先我们改一下最简单的miss shader:
extern "C" __global__ void __miss__radiance()
    {
        uint32_t isectPtr0 = optixGetPayload_0();
        uint32_t isectPtr1 = optixGetPayload_1();
        Interaction* interaction = reinterpret_cast<Interaction*>(unpackPointer(isectPtr0, isectPtr1));
        interaction->distance = FLT_MAX;

        const cudaTextureObject_t& sbtData
            = *(const cudaTextureObject_t*)optixGetSbtDataPointer();
        vec3f ray_dir = optixGetWorldRayDirection();
        vec2f uv = sampling_equirectangular_map(ray_dir);
        vec4f fromTexture = tex2D<float4>(sbtData, uv.x, uv.y);
        interaction->mat_mes.emitter = (vec3f)fromTexture;
    }
相当于把环境贴图的像素作为材质自发光,光线打到无穷远相当于对一个有强烈自发光的环境材质进行采样。
接下来我们修改closesthit shader。注意,上一节我曾提过,实际上bsdf的计算并不应该放在closesthit shader中计算,因为在closesthit shader中,我们还没有计算出采样的出射方向,这样bsdf的参数不齐全。因此在closesthit shader中,我们只计算交点所在的世界坐标、法线方向、uv值、材质信息,将它们全部存储到Interaction求交信息中。当然,这意味着我们的Interaction也要补充一下成员变量:
struct Interaction
{
    float bias = 0.001f;

    float distance;
    vec3f position;
    vec3f geomNormal;
    vec2f texcoord;
    cudaTextureObject_t* texture;

    material_mes mat_mes;
...
然后closesthit shader就好写了,把这些成员的信息计算出来放进去就好了:
extern "C" __global__ void __closesthit__radiance()
    {
        uint32_t isectPtr0 = optixGetPayload_0();
        uint32_t isectPtr1 = optixGetPayload_1();
        Interaction* interaction = reinterpret_cast<Interaction*>(unpackPointer(isectPtr0, isectPtr1));
        const TriangleMeshSBTData& sbtData
            = *(const TriangleMeshSBTData*)optixGetSbtDataPointer();

        const int   primID = optixGetPrimitiveIndex();
        const vec3i index = sbtData.index[primID];
        const float u = optixGetTriangleBarycentrics().x;
        const float v = optixGetTriangleBarycentrics().y;

        const vec3f& A = sbtData.vertex[index.x];
        const vec3f& B = sbtData.vertex[index.y];
        const vec3f& C = sbtData.vertex[index.z];
        const vec3f pos = (1.f - u - v) * A + u * B + v * C;
        interaction->position = pos;

        vec3f Ng = cross(B - A, C - A);
        vec3f Ns = (sbtData.normal)
            ? ((1.f - u - v) * sbtData.normal[index.x]
                + u * sbtData.normal[index.y]
                + v * sbtData.normal[index.z])
            : Ng;

        const vec3f rayDir = optixGetWorldRayDirection();

        if (dot(rayDir, Ng) > 0.f) Ng = -Ng;
        Ng = normalize(Ng);

        if (dot(Ng, Ns) < 0.f)
            Ns -= 2.f * dot(Ng, Ns) * Ng;
        Ns = normalize(Ns);

        interaction->geomNormal = Ns;

        if (sbtData.texcoord) {
            interaction->texcoord = (1.f - u - v) * sbtData.texcoord[index.x]
                + u * sbtData.texcoord[index.y]
                + v * sbtData.texcoord[index.z];
        }
        interaction->texture = sbtData.texture;
        interaction->mat_mes = sbtData.mat_mes;
    }
我们将bsdf着色结果、反射方向的计算全部放到光路迭代的循环中去计算。因为涉及到很多不同材质的计算,而且每个材质的计算代码很臃肿,因此我开了一个MyMaterial.h来放计算材质着色和反射方向的函数:
MyMaterial.h
#pragma once
#include "MyInteraction.h"

#define PI 3.1415926
using namespace osc;

typedef gdt::LCG<16> Random;
struct PRD {
    Random random;
    vec3f  pixelColor;
};

__forceinline__ __device__ vec3f cal_diffuse_bsdf(const Interaction& isect, const vec3f& wi, vec3f *wo, float* pdf, const int ix, const int iy, const int frame_id) {
    vec3f diffuseColor = isect.mat_mes.diffuse;
    if (isect.mat_mes.diffuseTextureID != -1) {
        float u = isect.texcoord.x;
        float v = isect.texcoord.y;
        vec4f fromTexture = tex2D<float4>(isect.mat_mes.diffuse_texture, u, v);
        diffuseColor *= (vec3f)fromTexture;
    }
    vec3f bsdf = diffuseColor / float(PI);
    vec3f rnd;
    PRD prd;
    prd.random.init(frame_id * 234834 % 32849 + ix * 385932 % 82921,
        frame_id * 348593 % 43832 + iy * 324123 % 23415);
    rnd.x = prd.random() * 2 - 1;
    prd.random.init(frame_id * 972823 % 12971 + ix * 743782 % 82013,
        frame_id * 893022 % 28191 + iy * 918212 % 51321);
    rnd.y = prd.random() * 2 - 1;
    prd.random.init(frame_id * 383921 % 48839 + ix * 572131 % 47128,
        frame_id * 389291 % 29301 + iy * 716271 % 63291);
    rnd.z = prd.random() * 2 - 1;
    vec3f wos = normalize(isect.geomNormal + normalize(rnd));
    wo->x = wos.x; wo->y = wos.y; wo->z = wos.z;
    *pdf = 1 / (2 * float(PI));
    return bsdf;
}

__forceinline__ __device__ vec3f cal_bsdf(const Interaction &isect, const vec3f &wi, vec3f *wo, float *pdf,const int ix, const int iy, const int frame_id)
{
    vec3f result;
    if (isect.mat_mes.mat_kind == DIFFUSE) {
        result = cal_diffuse_bsdf(isect, wi, wo, pdf, ix, iy, frame_id);
    }
    return result;
}
cal_bsdf函数一共7个参数,isect就是拿求交结果信息,wi就是入射的光线方向,wo就是我们要计算出来的出射方向,pdf是我们要计算后写入的采样概率密度函数值,ix、iy、frame_id单纯是为了做采样而传入的随机数种子变量。cal_bsdf函数只是一个分流器,要将不同的材质分流到不同的材质计算函数中,例如DIFFUSE材质就调用cal_diffuse_bsdf函数。
我们再来看cal_diffuse_bsdf函数,直接拿出isect中存储的mat_mes信息,得到交点处材质的漫反射颜色、贴图编号,如果有贴图就进行采样;得到diffuse颜色后,我们代入lambert模型的bsdf函数:
bsdf=diffuse/Π
这样得到lambert模型的bsdf函数值。接下来我们计算pdf,因为我们是在半球面上均匀采样,因此每个方向的概率密度值是1/2Π,直接写入pdf即可;最后我们还要得到出射方向,我们就用上文用到的随机种子来随机采样,将采样到的出射方向写入wo,完成函数功能。
回到Raygen Shader中的光路迭代,可以改成:
for (int sampleID = 0; sampleID < numPixelSamples; sampleID++) {
            Ray myRay;
            myRay.origin = camera.position;
            myRay.direction = rayDir;
            vec3f radiance = 0.0f;
            vec3f accum = 1.0f;
            for (int bounces = 0; ; ++bounces)
            {
                if (bounces >= optixLaunchParams.maxBounce) {
                    radiance = 0.0f;
                    break;
                }
                Interaction isect;
                isect.distance = 0;
                unsigned int isectPtr0, isectPtr1;
                packPointer(&isect, isectPtr0, isectPtr1);
                optixTrace(optixLaunchParams.traversable,
                    myRay.origin,
                    myRay.direction,
                    0,    // tmin
                    1e20f,  // tmax
                    0.0f,   // rayTime
                    OptixVisibilityMask(255),
                    OPTIX_RAY_FLAG_DISABLE_ANYHIT,//OPTIX_RAY_FLAG_NONE,
                    RADIANCE_RAY_TYPE,            // SBT offset
                    RAY_TYPE_COUNT,               // SBT stride
                    RADIANCE_RAY_TYPE,            // missSBTIndex
                    isectPtr0, isectPtr1);
                if (isect.distance == FLT_MAX)
                {
                    if (bounces > 0)
                        radiance += isect.mat_mes.emitter * accum;
                    else
                        radiance += isect.mat_mes.emitter * accum / 2.0f;
                    break;
                }
                radiance += isect.mat_mes.emitter * accum;
                vec3f wo;
                float pdf = 0.0f;
                vec3f bsdf = cal_bsdf(isect, myRay.direction, &wo, &pdf, ix, iy, optixLaunchParams.frame.frameID);
                float cosine = fabsf(dot(isect.geomNormal, myRay.direction));
                accum *= bsdf * cosine / pdf;
                myRay = isect.spawn_ray(wo);
            }
            pixelColor += radiance;
        }
这里的改动也不大,就是把之前那个不明所以的mat_color替换成了有明确意义的自发光mat_mes.emitter,根据本文Part.1所讲的算法,每次迭代先给radiance+=材质的自发光*accum;然后我们要给accum累乘一个渲染方程的积分项,渲染方程的积分项是bsdf*cosine的形式,由于我们使用蒙特卡洛积分的思路通过采样来估计积分值,因此采样得到的值需要除以一个pdf才能无偏估计。所以我们现在需要获得材质的bsdf值和pdf这两个值,此时调用cal_bsdf函数便可获得bsdf值、采样pdf和出射方向,让accum累乘bsdf*cosine/pdf,最后使用出射方向进行下一次迭代即可。
好了,这样我们的材质架构就搭建完毕了。不过目前还是只有DIFFUSE一种材质,我们接下来做一下METAL材质。
Part6. METAL材质
METAL材质就是镜面反射材质,当表面完全光滑时,出射方向固定,BSDF值为1,pdf不可计算,对于这种情况我们只采样镜面反射方向就ok了,没有必要做蒙特卡洛积分;当表面有粗糙时,出射方向会形成一个波瓣,此时BSDF和pdf都不好计算了,需要套用更复杂的微表面模型才能拟合。但是现在我们只是从最简单的材质实例做起,没有必要上微表面,所以我们直接强行置粗糙的METAL材质的BSDF值为1,pdf与散射范围呈正比,若roughness越高,散射范围越大,pdf的值也越大。(当然目前这个材质模型并不符合物理,不过我们可以先这样做,日后做disney再引入微表面模型)
经过思考,决定还是让METAL材质读取mtl文件,并多读取一个roughness分量。
for (int faceID = 0; faceID < shape.mesh.material_ids.size(); faceID++) {
                    if (shape.mesh.material_ids[faceID] != materialID) continue;
                    tinyobj::index_t idx0 = shape.mesh.indices[3 * faceID + 0];
                    tinyobj::index_t idx1 = shape.mesh.indices[3 * faceID + 1];
                    tinyobj::index_t idx2 = shape.mesh.indices[3 * faceID + 2];

                    vec3i idx(addVertex(mesh, attributes, idx0, knownVertices),
                        addVertex(mesh, attributes, idx1, knownVertices),
                        addVertex(mesh, attributes, idx2, knownVertices));
                    mesh->index.push_back(idx);
                    if (mat_kind == DIFFUSE) {
                        mesh->mat_mes.diffuse = (const vec3f&)materials[materialID].diffuse;
                        mesh->mat_mes.diffuseTextureID = loadTexture(model,
                            knownTextures,
                            materials[materialID].diffuse_texname,
                            modelDir);
                    }
                    if (mat_kind == METAL && !materials.empty()) {
                        mesh->mat_mes.diffuse = (const vec3f&)materials[materialID].diffuse;
                        mesh->mat_mes.diffuseTextureID = loadTexture(model,
                            knownTextures,
                            materials[materialID].diffuse_texname,
                            modelDir);
                        mesh->mat_mes.roughness = (1000 - (const float&)materials[materialID].shininess) / 1000.0f;
                    }
                    mesh->mat_mes.mat_kind = mat_kind;
                }
这里有一个奇怪的事情,我用blender导出的材质,粗糙度居然被写成了Ns形式(shiness),结果我不得不把他做了个换算,才变成[0,1]区间的粗糙度数值。然后我们直接去写MyMaterial.h。
__forceinline__ __device__ vec3f cal_metal_bsdf(const Interaction& isect, const vec3f& wi, vec3f* wo, float* pdf, const int ix, const int iy, const int frame_id) {
    vec3f diffuseColor = isect.mat_mes.diffuse;
    if (isect.mat_mes.diffuseTextureID != -1) {
        float u = isect.texcoord.x;
        float v = isect.texcoord.y;
        vec4f fromTexture = tex2D<float4>(isect.mat_mes.diffuse_texture, u, v);
        diffuseColor *= (vec3f)fromTexture;
    }
    vec3f bsdf = diffuseColor / float(PI);
    vec3f out;
    out = wi - 2.0f * (vec3f)dot(wi, isect.geomNormal) * isect.geomNormal;
    out = normalize(out);
    vec3f out1 = cross(out, vec3f(1.0f));
    vec3f out2 = cross(out, out1);
    PRD prd;
    prd.random.init(frame_id * 234834 % 32849 + ix * 385932 % 82921, frame_id * 348593 % 43832 + iy * 324123 % 23415);
    vec3f out3 = normalize(out + (prd.random() * 2 - 1) * out1 * isect.mat_mes.roughness + (prd.random() * 2 - 1) * out2 * isect.mat_mes.roughness);
    if (dot(out3, isect.geomNormal) <= 0)
        out3 = out;
    *wo = out3;
    *pdf = 1 / ((float(PI) - 1) * isect.mat_mes.roughness + 1);
    return bsdf;
}

__forceinline__ __device__ vec3f cal_bsdf(const Interaction &isect, const vec3f &wi, vec3f *wo, float *pdf,const int ix, const int iy, const int frame_id)
{
    vec3f result;
    if (isect.mat_mes.mat_kind == DIFFUSE) {
        result = cal_diffuse_bsdf(isect, wi, wo, pdf, ix, iy, frame_id);
    }
    else if (isect.mat_mes.mat_kind == METAL) {
        result = cal_metal_bsdf(isect, wi, wo, pdf, ix, iy, frame_id);
    }
    return result;
}
代码看上去略复杂,其实原理不难理解:首先还是采样它的diffuse颜色,然后计算镜面反射方向并存到out中。对于粗糙的metal,就需要在法线的垂直面上随机采样一个向量作为扰动向量,这个向量的扰动范围由roughness的数值决定。决定了扰动范围后,就在这个范围内随机抽样一个扰动向量并加在反射方向上,以此模拟最简单的反射“波瓣”。至于pdf,对于完全镜面反射pdf可以直接取1;而对于粗糙度值=1的情况,此时应该在四分之一球面上进行采样,所以pdf=1/Π。而对于其他粗糙度取值,就在1~1/Π直接插值即可。
对于metal材质而言,理论上roughness=1的时候就是lambert。但是现在roughness=1的时候还是能看到轻微的环境散射,这说明我们的散射力度依旧不够大。所以我想了一个新的方法:将diffuse模型和镜面模型混合,而混合的比例由roughness来决定:
__forceinline__ __device__ vec3f cal_mirror_bsdf(const Interaction& isect, const vec3f& wi, vec3f* wo, float* pdf, const int ix, const int iy, const int frame_id) {
    vec3f diffuseColor = isect.mat_mes.diffuse;
    if (isect.mat_mes.diffuseTextureID != -1) {
        float u = isect.texcoord.x;
        float v = isect.texcoord.y;
        vec4f fromTexture = tex2D<float4>(isect.mat_mes.diffuse_texture, u, v);
        diffuseColor *= (vec3f)fromTexture;
    }
    vec3f bsdf = diffuseColor / float(PI);
    vec3f out;
    out = wi - 2.0f * (vec3f)dot(wi, isect.geomNormal) * isect.geomNormal;
    *wo = normalize(out);
    *pdf = 1;
    return bsdf;
}

__forceinline__ __device__ vec3f cal_bsdf(const Interaction &isect, const vec3f &wi, vec3f *wo, float *pdf,const int ix, const int iy, const int frame_id)
{
    PRD prd;
    vec3f result;
    if (isect.mat_mes.mat_kind == DIFFUSE) {
        result = cal_diffuse_bsdf(isect, wi, wo, pdf, ix, iy, frame_id);
    }
    else if (isect.mat_mes.mat_kind == METAL) {
        //result = cal_metal_bsdf(isect, wi, wo, pdf, ix, iy, frame_id);
        prd.random.init(frame_id * 234834 % 32849 + ix * 385932 % 82921, frame_id * 348593 % 43832 + iy * 324123 % 23415);
        float res = prd.random();
        if (res < isect.mat_mes.roughness)
            result = cal_diffuse_bsdf(isect, wi, wo, pdf, ix, iy, frame_id);
        else
            result = cal_mirror_bsdf(isect, wi, wo, pdf, ix, iy, frame_id);
    }
    return result;
}
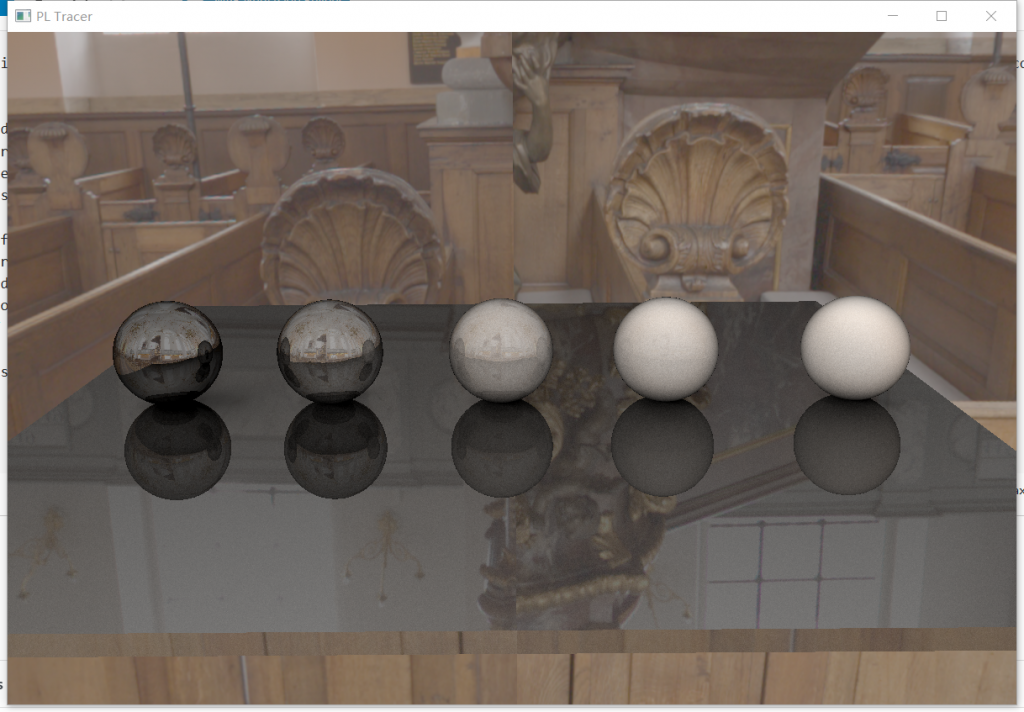
结果发现这样的结果就比较好了,过渡很柔和,并且粗糙度最大的时候和漫反射无异:
Part7. 透射材质
透射材质的原理也比较简单,不过考虑的情况需要多一些:首先要有折射率,因为物体内部一般会充有介质,光线从空气进入介质会发生偏折;同时会存在全内反射的情况;具体有多少能量发生折射、多少能量发射反射需要由菲涅尔公式决定,其中schlick给出了一个经验公式来计算反射比率。
首先我们给材质信息结构体补充一个transparent和ior,然后给Interaction补充一个realNormal。因为在hit shader中我们一般遇到法线与入射光线同向的情况,喜欢强行把法线纠正。但如今有了透射材质,所以我们将纠正前的法线预存起来,这样在做透射方向计算的时候,能知道当前入射光线处于介质内还是介质外。
struct material_mes {
    material_kind mat_kind;

    vec3f diffuse;
    float roughness;
    float transparent;
    float ior = 1.1f;
    vec3f emitter = 0;

    int diffuseTextureID{ -1 };
    cudaTextureObject_t diffuse_texture;
};

struct Interaction
{
    float bias = 0.001f;

    float distance;
    vec3f position;
    vec3f geomNormal;
    vec3f realNormal;  // 这个是没被矫正方向的法线
    vec2f texcoord;
...
bsdf我们直接套用当初C++光追渲染器的透射材质代码:
__forceinline__ __device__ float my_min(const float a, const float b) {
    return a < b ? a : b;
}

__forceinline__ __device__ float length_squared(const vec3f v) {
    return v.x * v.x + v.y * v.y + v.z * v.z;
}

__forceinline__ __device__ vec3f reflect(const vec3f v, const vec3f n){
    return v - 2 * dot(v, n) * n;
}
__forceinline__ __device__ vec3f refract(const vec3f uv, const vec3f n, double etai_over_etat){
    auto cos_theta = dot(-uv, n);
    vec3f r_out_perp = (float)etai_over_etat * (uv + cos_theta * n);
    vec3f r_out_parallel = (float)(-sqrt(fabs(1.0 - length_squared(r_out_perp)))) * n;
    return r_out_perp + r_out_parallel;
}
__forceinline__ __device__ double schlick(double cosine, double ref_idx){
    auto r0 = (1 - ref_idx) / (1 + ref_idx);
    r0 *= r0;
    return r0 + (1 - r0) * pow((1 - cosine), 5);
}

__forceinline__ __device__ vec3f cal_dielectric_bsdf(const Interaction& isect, const vec3f& wi, vec3f* wo, float* pdf, const int ix, const int iy, const int frame_id) {
    vec3f diffuseColor = isect.mat_mes.diffuse;
    if (isect.mat_mes.diffuseTextureID != -1) {
        float u = isect.texcoord.x;
        float v = isect.texcoord.y;
        vec4f fromTexture = tex2D<float4>(isect.mat_mes.diffuse_texture, u, v);
        diffuseColor *= (vec3f)fromTexture;
    }
    vec3f bsdf = diffuseColor;
    *pdf = 1;
    vec3f out;
    float etai_over_etat = 0;
    if (dot(wi, isect.realNormal) > 0) etai_over_etat = isect.mat_mes.ior;
    else etai_over_etat = 1.0f / isect.mat_mes.ior;
    vec3f unit_direction = normalize(wi);
    double cos_theta = my_min(dot(-unit_direction, isect.geomNormal), 1.0);
    double sin_theta = sqrt(1.0 - cos_theta * cos_theta);
    if (etai_over_etat * sin_theta > 1.0f) { //全内反射
        *wo = reflect(unit_direction, isect.geomNormal);
        return bsdf;
    }
    double reflect_prob = schlick(cos_theta, etai_over_etat);//反射率
    PRD prd;
    prd.random.init(frame_id * 234834 % 32849 + ix * 385932 % 82921, frame_id * 348593 % 43832 + iy * 324123 % 23415);
    if (prd.random() < reflect_prob) {
        *wo = reflect(unit_direction, isect.geomNormal);
        return bsdf;
    }
    if (prd.random() < isect.mat_mes.transparent) {
        //*wo = reflect(unit_direction, isect.geomNormal);
        //return bsdf;
    }
    *wo = refract(unit_direction, isect.geomNormal, etai_over_etat);
    return bsdf;
}
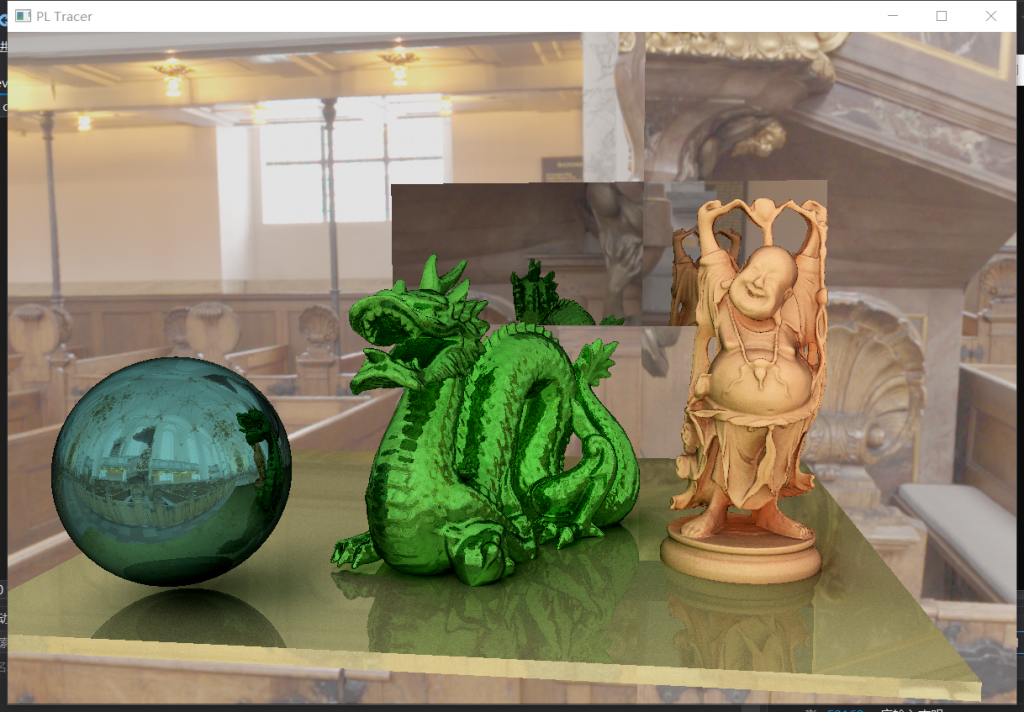
写了一些工具函数,建议新建一个MyTool.h放进去。其他内容就和之前的C++光追渲染器无异了。当出现全内反射、菲涅尔效应随机到反射、1-透射率的概率随机到反射时,会执行反射逻辑,其他情况下都执行透射逻辑。
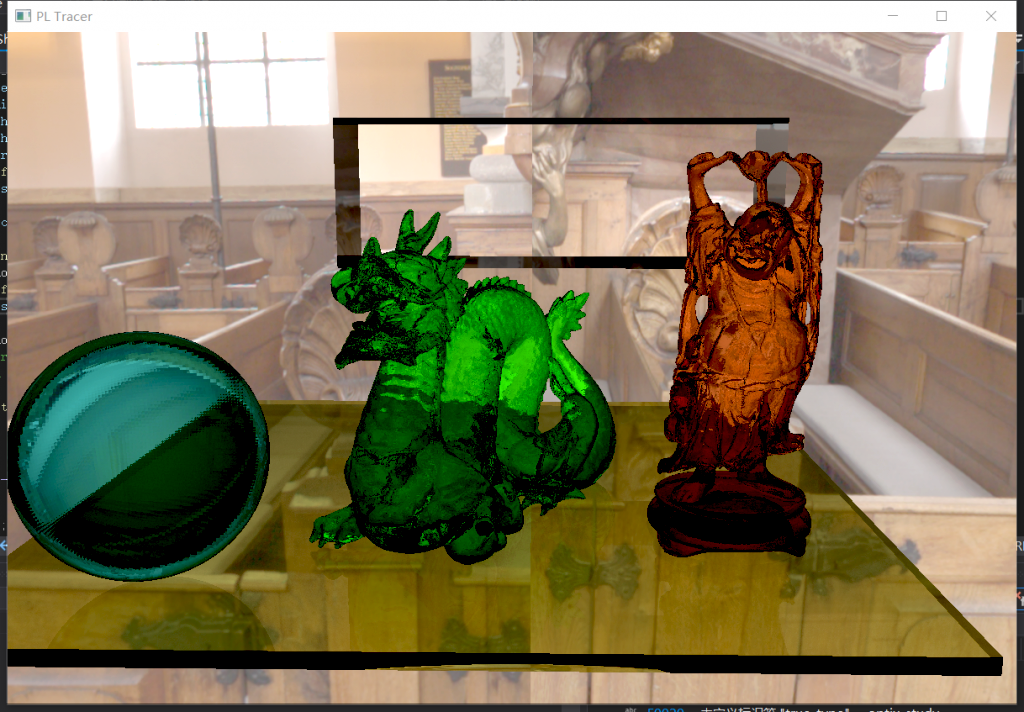
匪夷所思的效果。。。我还寻思是不是我算法写错了,结果对照了下blender发现blender的效果也没好到哪去。。。下面是blender的结果:
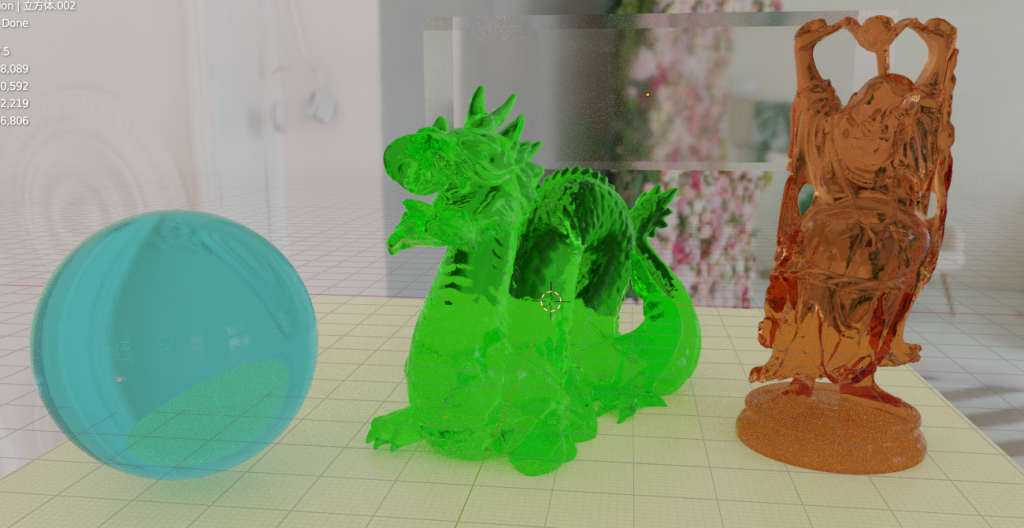
只能说给的参数不是太合格,但是大体效果可以和blender差不多了,也就算是成功了。(比烂局)


Comments | 5 条评论
你好,感谢你的文档,请问一下,在optix的渲染过程中,我想要在场景中重新加载,或者删去一些物体,我应该怎么做,一般好像是重建加速结构,在重建中,会清除顶点信息和加速结构,然后重建,然后是重建纹理信息,也需要清除然后重建,最后是SBT,也需要清除和重建,但是这些操作好像都会导致渲染崩溃,毕竟是释放了原来的数据。这个问题怎么解决了,是不释放,然后把这些的东西都全部重新重建吗?另外做一份,然后清楚原来的空间吗?
@heyunan 如果是加入了一个很大的模型,或者是直接重置场景的话,是需要清楚全部数据 重新加载SBT和accel加速结构的。在重置过程中,要取消一切渲染的调用逻辑(glwindows停止循环),可以理解为重启项目。
但是我也听说当改动很小的时候,是可以不重构加速结构的,但是这个算法我没有关注过,可以去查一下。最近有点忙,没有学习optix,见谅(*^_^*)
请问佬有没有项目完整的代码可供参考,有没有github。
@whh https://github.com/Puluomiyuhun/PL_Tracer
@pladmin 感谢大神回复我。。。